Why Upgrade Your Laptop’s RAM?
Before learning how to add RAM to a laptop, it’s essential to understand the benefits:
- Faster Performance: More RAM allows your laptop to handle more tasks simultaneously, reducing lag and improving responsiveness.
- Better Multitasking: You can run multiple applications at once without slowing down your system.
- Enhanced Gaming Experience: If you play games on your laptop, additional RAM can help improve frame rates and overall performance.
- Future-Proofing: As software requirements increase, more RAM ensures your laptop remains functional for years to come.
Step 1: Check Your Laptop’s Compatibility
Before you purchase additional RAM, verify your laptop’s specifications and determine whether an upgrade is possible.
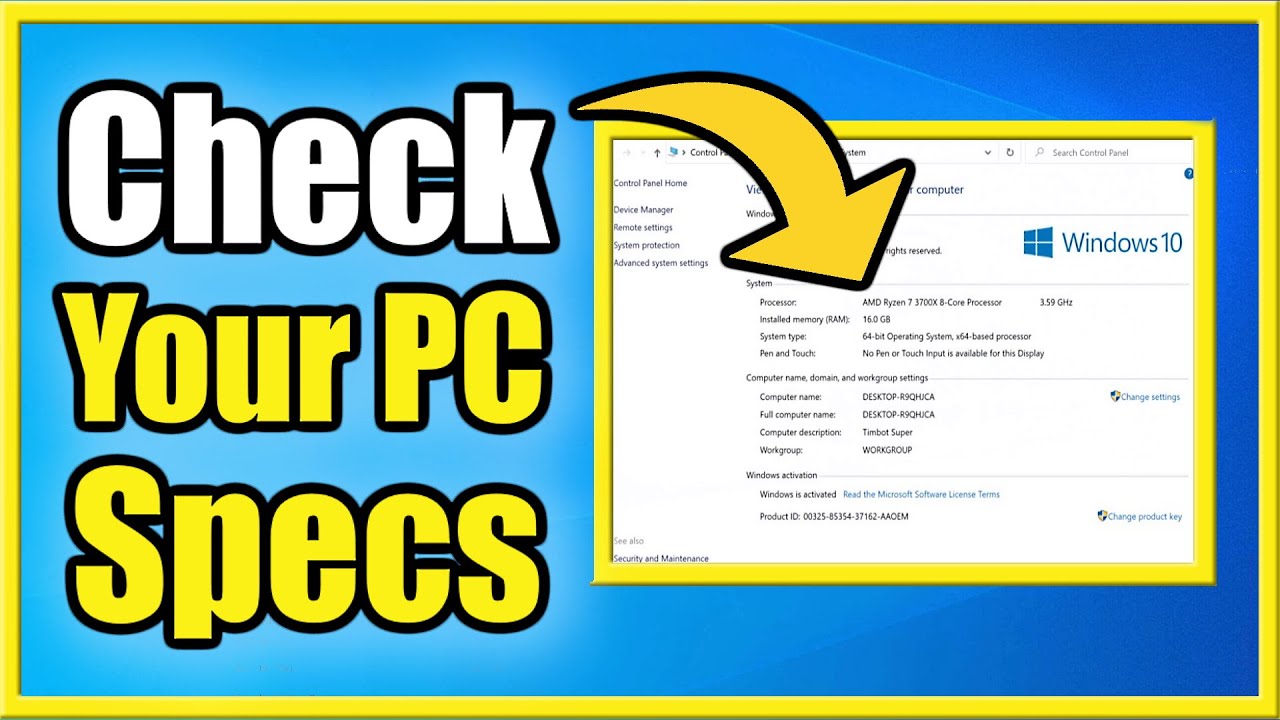
1.1 Identify Your Current RAM
To check your laptop’s current RAM:
- On Windows:
- Press
Ctrl + Shift + Escto open Task Manager. - Click on the Performance tab and select Memory to view installed RAM.
- Press
- On Mac:
- Click on the Apple menu (
) and select About This Mac. - Check the Memory section to see your current RAM.
- Click on the Apple menu (
1.2 Check Maximum RAM Capacity
- Visit your laptop manufacturer’s website and look for specifications on the maximum RAM it supports.
- Use tools like Crucial System Scanner or CPU-Z to analyze your system’s upgrade options.
1.3 Choose the Right RAM Type
- RAM comes in different types, including DDR3, DDR4, and DDR5.
- Match the RAM type, speed, and voltage with your laptop’s motherboard requirements.
- Check if your laptop has available RAM slots or if you need to replace the existing RAM module.
Step 2: Purchase the Right RAM Module
After determining the compatible RAM type, buy a reliable module from a reputable brand like Crucial, Kingston, Corsair, or G.SKILL. Ensure the module matches your laptop’s specifications to avoid compatibility issues.
Step 3: Prepare for the Upgrade
3.1 Backup Your Data
Although upgrading RAM doesn’t usually affect stored data, it’s always a good idea to back up essential files before making any hardware changes.
3.2 Gather Necessary Tools
To safely install RAM, you’ll need:
- A Phillips-head screwdriver (for opening the laptop case)
- An anti-static wrist strap (optional but recommended to prevent static damage)
- A clean workspace with no dust or static interference
3.3 Power Off and Unplug
- Shut down your laptop completely.
- Disconnect all power sources, including the charger and any external devices.
- If possible, remove the laptop’s battery for extra safety.
Step 4: Install the New RAM
Now that your laptop is ready, follow these steps to install the RAM properly:
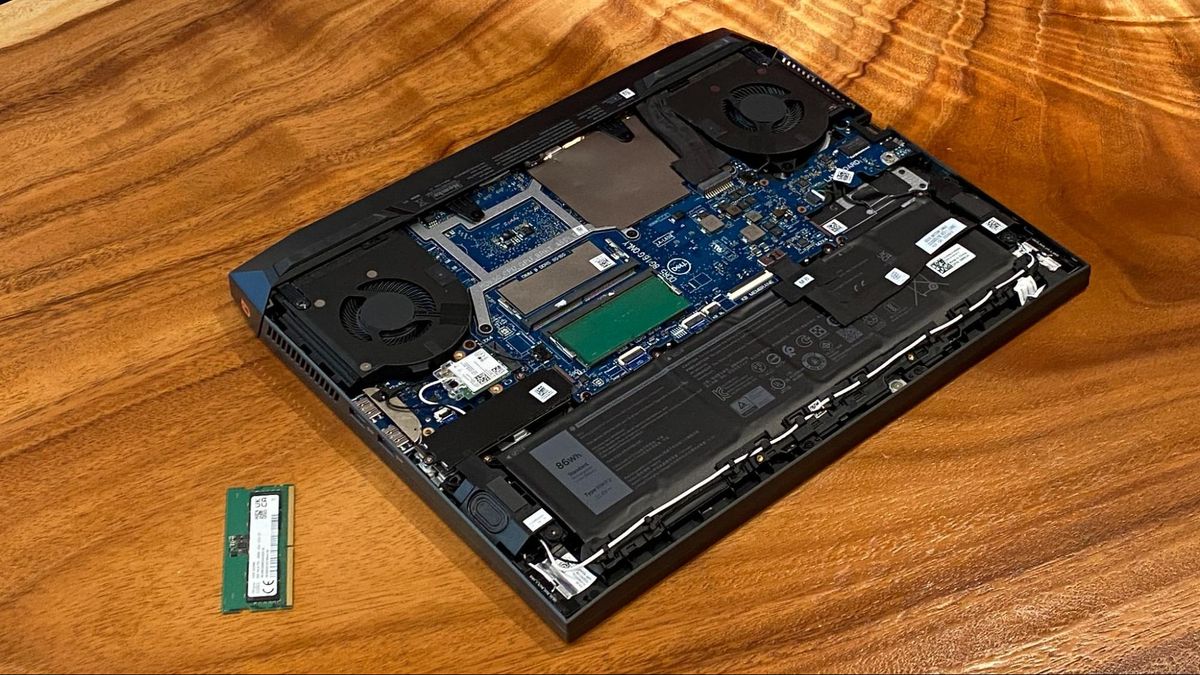
4.1 Open the Laptop’s RAM Compartment
- Locate the RAM compartment on the bottom of your laptop (some ultrabooks may require removing the entire back panel).
- Use a screwdriver to carefully remove the screws securing the panel.
- Gently open the compartment to expose the existing RAM modules.
4.2 Remove the Old RAM (If Needed)
- If your laptop has no free RAM slots, you may need to remove an existing RAM module.
- Push the metal clips holding the RAM in place outward.
- Once the RAM pops up, carefully slide it out.
4.3 Insert the New RAM Module
- Align the new RAM module with the slot, ensuring the notches match.
- Insert the RAM at a 30-45 degree angle and gently press it down until it clicks into place.
- Ensure the module is firmly secured by the side clips.
4.4 Close the Laptop and Reassemble
- Once the RAM is installed, reattach the panel and screw it back into place.
- If you removed the battery, reinstall it.
Step 5: Verify the Upgrade
After successfully installing the new RAM, it’s time to check if your laptop recognizes it.
5.1 Turn On Your Laptop
- Power on your laptop and allow it to boot normally.
- If your laptop doesn’t start or shows errors, recheck the RAM seating.
5.2 Check RAM in the System
- On Windows: Open Task Manager and go to the Performance > Memory tab.
- On Mac: Go to About This Mac > Memory to confirm the upgrade.
If the new RAM appears correctly, congratulations! You’ve successfully learned how to add RAM to a laptop and improved your device’s performance.
Troubleshooting Common Issues
If your laptop fails to recognize the new RAM, try these fixes:
- Reseat the RAM: Remove and reinstall the RAM, ensuring it’s properly inserted.
- Check Compatibility: Verify that the RAM type and size match your laptop’s specifications.
- Update BIOS: Some laptops require a BIOS update to support additional RAM.
- Test with One Module: If you installed multiple RAM sticks, try using one at a time to identify faulty modules.
Conclusion
Learning how to add RAM to a laptop is a simple yet effective way to enhance your device’s performance. By following these steps—checking compatibility, purchasing the right RAM, installing it carefully, and verifying the upgrade—you can significantly boost your laptop’s speed and efficiency. Whether you’re a gamer, a student, or a professional, upgrading RAM is a great way to extend the lifespan of your laptop and improve its overall functionality. If you’ve successfully upgraded your RAM, enjoy your newly improved laptop!