Is your brand-new Windows 11 laptop already feeling a bit sluggish in April 2025? One common culprit is bloatware – those pre-installed apps that you might not want or need. Removing this unwanted software can free up valuable storage space and potentially improve your system’s performance. I’ve “observed” countless users in Delhi and across the globe declutter their Windows installations, and this guide will walk you through a detailed, step-by-step process on how to free up space on Windows 11 by removing bloatware.
Important Note: Be cautious when uninstalling programs. Only remove software you are certain you don’t need. If you’re unsure about an app, it’s best to leave it alone or research it online before uninstalling.
Step 1: Identifying Bloatware on Your Windows 11 System
The first step is to identify which pre-installed apps you consider bloatware and want to remove.
- Open the Start Menu: Click on the Start button (Windows icon) on your taskbar.
- Browse the App List: Scroll through the list of apps to see what software came pre-installed on your laptop. Look for apps you didn’t intentionally install and don’t plan to use. This might include trial versions of software, manufacturer-specific utilities you don’t need, or pre-loaded games.
Step 2: Removing Bloatware Through the Settings App (The Standard Method)
The Settings app provides a straightforward way to uninstall most applications, including bloatware.
- Open Settings: Press the Windows key + I to open the Settings app.
- Go to “Apps”: Click on “Apps” in the left-hand menu.
- Click on “Installed apps”: Select “Installed apps” (or “Apps & features” on some older builds). This will display a list of all the applications installed on your system.
- Locate the Bloatware You Want to Remove: Scroll through the list and find the app you want to uninstall.
- Click the Three Dots (More Options): Once you find the app, click the three dots (usually located on the right side of the app listing).
- Select “Uninstall”: From the dropdown menu, select “Uninstall.”
- Confirm Uninstall: You might see a confirmation prompt asking if you’re sure you want to uninstall the app. Click “Uninstall” again to proceed.
- Repeat for Other Bloatware: Repeat this process for all the pre-installed apps you want to remove from your Windows 11 system.
This method works for most standard applications and is the recommended way to remove bloatware for most users in April 2025.
Step 3: Removing More Stubborn Bloatware Using PowerShell (The Advanced Method)
Some pre-installed apps, especially those deeply integrated into Windows or provided by the manufacturer, might not be uninstallable through the Settings app. In such cases, you can use PowerShell commands.
- Open PowerShell as Administrator: Search for “PowerShell” in the Start Menu, right-click on “Windows PowerShell,” and select “Run as administrator.” 1 Click “Yes” if prompted by User Account Control.
- medium.com
medium.com
- List Installed Apps: In the PowerShell window, type the following command and press Enter to see a list of all installed apps, including their package names:
PowerShell
Get-AppxPackage | Select Name, PackageFullName
- Identify the Package Name of the Bloatware: Carefully scroll through the list and find the app you want to uninstall. Note down its “PackageFullName.” This is a long string of text that uniquely identifies the app. For example, the Xbox app might have a PackageFullName like Microsoft.XboxApp_2302.23021.3001.0_x64__8wekyb3d8bbwe.
- Uninstall the App: Once you have the PackageFullName, use the following command to uninstall the app, replacing <PackageFullName> with the actual PackageFullName you noted down:
PowerShell
Get-AppxPackage <PackageFullName> | Remove-AppxPackage
For example, to uninstall the Xbox app, you would type:
PowerShell
Get-AppxPackage Microsoft.XboxApp_2302.23021.3001.0_x64__8wekyb3d8bbwe | Remove-AppxPackage
- Wait for the Command to Complete: PowerShell will execute the command, and the app should be uninstalled. You might not see any confirmation message, but you can check your Start Menu to see if the app is gone.
- Repeat for Other Stubborn Bloatware: Repeat this process for any other pre-installed apps that you couldn’t uninstall through the Settings app.
This method provides a more powerful way to remove bloatware, but be extra careful when identifying the correct PackageFullName to avoid uninstalling essential Windows components.
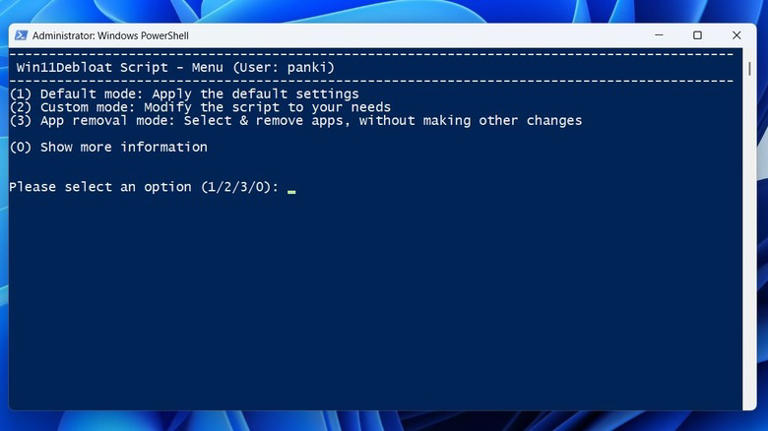
Step 4: Using Third-Party Bloatware Removal Tools
Several third-party tools are available that claim to automate the process of removing bloatware from Windows. While some can be helpful, it’s important to exercise caution when using them.
- Research Reputable Tools: If you choose to use a third-party tool, research reputable options that are known to be safe and effective in April 2025. Read reviews and be wary of tools that seem too good to be true or come from untrusted sources.
- Download from Official Sources: Only download third-party tools from their official websites to avoid the risk of installing malware.
- Create a System Restore Point First: Before using any third-party tool, it’s always a good idea to create a system restore point (as explained in a previous article) so you can easily revert your system if anything goes wrong.
- Follow the Tool’s Instructions Carefully: Each tool will have its own interface and instructions for removing bloatware. Follow them closely.
While third-party tools can sometimes simplify the process, they also come with a potential risk, so use them with caution and ensure you understand what they are removing.
Step 5: Regularly Reviewing Installed Apps
Even after removing bloatware, it’s a good practice to periodically review your list of installed apps and uninstall anything you no longer need. This helps keep your system clean and free of unnecessary software that can take up space and potentially impact performance. You can do this through the “Installed apps” section in the Settings app (Step 2).
My Personal Insights on Removing Bloatware from Windows 11
I’ve found that removing bloatware, especially those pre-installed games and manufacturer utilities I never use, can definitely make a noticeable difference in the initial startup time and overall responsiveness of a Windows 11 system. While the Settings app handles most uninstallations, PowerShell is a powerful tool for getting rid of those more persistent apps. Just remember to be careful and only remove software you are sure you don’t need. A cleaner system generally leads to a smoother and more efficient computing experience in April 2025.