Category: Editorial

  • How to Find System Specs in Windows PC

    How to Find System Specs in Windows PC

    Knowing your Windows PC’s system specifications is essential for everything from checking software compatibility to planning hardware upgrades. Fortunately, Windows offers several built-in tools to help you gather this information, from quick overviews to detailed reports.

    Step 1: Get a Quick Overview (Settings – Windows 10 & 11)

    • This is the fastest and easiest way to find basic information about your CPU, RAM, and Windows version. This method works similarly for both Windows 10 and Windows 11.
    • Open Settings:
    • Windows 11: Right-click on the Start button (the Windows logo) on your taskbar and select “Settings.”
    • Windows 10: Click the Start button (Windows logo) in the bottom-left corner, then click the gear icon (Settings).
    • Keyboard Shortcut (Both): Press Windows key + I.
    • Navigate to “About”:
    • In the Settings window, select “System” from the left-hand menu.
    • Then, scroll down the left-hand menu and click on “About” (usually at the very bottom).
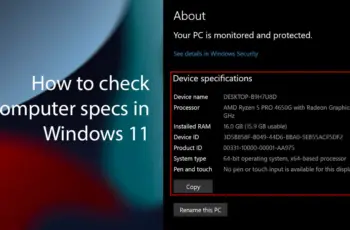
    • View Device Specifications: On the right side of the “About” screen, you will see a section titled “Device specifications.” Here, you’ll find:
    • Processor: Your CPU model and clock speed (e.g., Intel Core i7-12700K).
    • Installed RAM: The amount of RAM (Random Access Memory) installed in your PC (e.g., 16.0 GB).
    • Device name, Product ID, System type: (e.g., 64-bit operating system, x64-based processor).
    • Pen and touch: Indicates touch screen capabilities. You will also find “Windows specifications” below this, detailing your Windows edition, version, and OS build.

      Step 2: Access Detailed System Information (System Information Tool)

    • For a more comprehensive look at nearly every hardware and software component of your PC, the System Information tool is invaluable.
    • Open System Information:
    • Search: Click the Start button or Search icon on your taskbar, type “System Information” (or just “msinfo32”), and then click on the “System Information” app from the search results.
    • Run Command: Press Windows key + R to open the Run dialog box. Type msinfo32 and press Enter.
    • Explore System Summary: The “System Information” window will open. By default, it displays the “System Summary” on the right pane. This summary includes:
    • OS Name: Your Windows operating system version (e.g., Microsoft Windows 11 Home).
    • System Manufacturer & Model: Useful for identifying your computer model (e.g., Dell Inc., XPS 15 9520).
    • Processor: Detailed CPU information, including architecture.
    • Installed Physical Memory (RAM): Total RAM.
    • BIOS Version/Date: Important for firmware updates.
    • Motherboard Manufacturer/Product: Identifies your motherboard.
    • System Type: (e.g., x64-based PC).
    • Browse Components for More Detail:
    • Use the left-hand navigation pane to expand categories like “Hardware Resources,” “Components,” and “Software Environment.”
    • For specific details like your Graphics Card (GPU), expand “Components” and click on “Display.”
    • For Storage (Hard Drives/SSDs), expand “Components” and click on “Storage” then “Disks.
    • This tool provides a wealth of information, sometimes overwhelming, but very thorough.

      Step 3: Check Hardware in Real-Time (Task Manager)

    • The Task Manager is not just for closing unresponsive programs; its “Performance” tab provides real-time monitoring and basic specifications of your core hardware components.
    • Open Task Manager:
    • Keyboard Shortcut: Press Ctrl + Shift + Esc.
    • Taskbar: Right-click on an empty space on your taskbar and select “Task Manager.”
    • Go to Performance Tab: Click on the “Performance” tab at the top of the Task Manager window.
    • View Component Details: In the left pane, you’ll see a list of your main hardware components:
    • CPU: Shows your processor model, usage, speed, cores, and logical processors.
    • Memory: Displays total RAM, usage, and speed.
    • Disk: Shows your storage drives (HDD/SSD) and their activity.
    • GPU: Provides information about your graphics card(s), including usage, dedicated memory, and driver version. (Note: On older Windows 10 versions, GPU info might be less detailed or absent).
    • Ethernet/Wi-Fi: Network adapter details. This method is excellent for checking if your hardware is meeting its potential or bottlenecking performance.

      Step 4: For Graphics and DirectX Information (DxDiag)

    • The DirectX Diagnostic Tool (DxDiag) is specifically useful for troubleshooting display and sound issues, and it provides detailed information about your graphics card (GPU) and DirectX version.
    • Open Run Dialog: Press Windows key + R.
    • Type DxDiag: In the Run dialog box, type dxdiag and press Enter.
    • Confirm Prompt: If prompted to check if your drivers are digitally signed, click “Yes.”
    • View System and Display Tabs:
    • The “System” tab provides general system info similar to the “About” page.
    • Switch to the “Display” tab(s) to find detailed information about your graphics card(s), including:
    • Name: Your GPU model (e.g., NVIDIA GeForce RTX 3070).
    • Manufacturer: (e.g., NVIDIA).
    • Chip Type, DAC Type, Device Type.
    • Display Memory (VRAM): Dedicated GPU memory.
    • Driver Version & Date: Crucial for troubleshooting display issues.
    • DirectX Features: Indicates if various DirectX capabilities are enabled.
    • The “Sound” and “Input” tabs provide information on audio devices and peripherals.

      Step 5: Using Command Prompt or PowerShell (Advanced Users)

    • For those comfortable with command-line interfaces, these tools offer quick ways to extract specific system information.
    • Command Prompt (systeminfo command):
    • Open Command Prompt: Click Start, type cmd, and select “Command Prompt.”
    • Type Command: Type systeminfo and press Enter.
    • View Report: The command will generate a detailed text-based report of your system’s hardware and software configuration. This can take a moment to compile. Look for sections like “Processor(s),” “Total Physical Memory,” “OS Name,” etc.
    • PowerShell (Get-ComputerInfo cmdlet):
    • Open PowerShell: Click Start, type powershell, and select “Windows PowerShell.”
    • Type Command: Type Get-ComputerInfo and press Enter.
    • View Comprehensive Info: This cmdlet provides a highly structured and comprehensive object of system and operating system properties. It’s often more organized than systeminfo and can be filtered for specific properties (e.g., Get-ComputerInfo -Property “*processor*”).

      Step 6: Using Third-Party Tools (For Even Deeper Analysis)

    • While Windows’ built-in tools are robust, some third-party applications offer even more granular detail, real-time sensor monitoring, or user-friendly interfaces, especially for specific hardware components.
    • CPU-Z: Provides extremely detailed information about your CPU, motherboard, RAM, and basic GPU info.
    • GPU-Z: Specializes in graphics card information, including real-time sensor data, clock speeds, and memory details.
    • Speccy: Offers a comprehensive overview of your entire system (CPU, RAM, Motherboard, GPU, Storage, Network, Peripherals) in a single, easy-to-read interface.
    • HWMonitor: Primarily a hardware monitoring tool that displays real-time temperatures, voltages, and fan speeds for various components.

      How to Use Third-Party Tools:

    • Download: Go to the official website of the chosen tool (e.g., cpuid.com for CPU-Z/GPU-Z, ccleaner.com/speccy for Speccy, cpuid.com for HWMonitor).
    • Install: Follow the installation prompts. Be cautious of bundled software during installation.
    • Launch & Analyze: Open the application. Most are self-explanatory and present the information clearly.
    • Knowing how to access your PC’s specifications is a fundamental skill for any Windows user. It empowers you to make informed decisions about your computer’s health, performance, and future upgrades.

      FAQ: How to Find System Specs in Windows PC

    • Q1: What are the most important PC specs to know?                                                            The most important PC specs to know typically include your Processor (CPU) model, the amount of Installed RAM, your Graphics Card (GPU) model, and your Storage type and capacity (HDD or SSD, and size). Knowing your Windows operating system version (e.g., Windows 10 Home, Windows 11 Pro) and whether it’s 64-bit is also crucial.
    • Q2: How do I check my graphics card (GPU) specs specifically?                                      You can check your GPU specs using:
    • DxDiag: Press Windows key + R, type dxdiag, press Enter, and go to the “Display” tab.
    • Device Manager: Press Windows key + X, select “Device Manager,” expand “Display adapters,” right-click on your GPU, and choose “Properties.”
    • Task Manager: Press Ctrl + Shift + Esc, go to the “Performance” tab, and click on “GPU.”
    • Third-party tools like GPU-Z provide the most detailed GPU information.
    • Q3: How can I find out how much RAM I have and its speed?                                        Settings (“About”): Provides the total Installed RAM.
    • System Information (msinfo32): Shows total Physical Memory.
    • Task Manager (“Performance” tab, “Memory”): Displays total RAM, its speed (e.g., 3200 MHz), and current usage. This is often the best quick view for both amount and speed.
    • Third-party tools like CPU-Z give even more granular details about each RAM stick (module).
    • Q4: My PC feels slow. How can checking specs help me troubleshoot?                            Checking specs can help you identify potential bottlenecks. For example:
    • Low RAM: If you have 4GB of RAM and try to run modern games, it will be slow.
    • Outdated CPU/GPU: If your processor or graphics card doesn’t meet the minimum requirements for a game or software, it will struggle.
    • HDD vs. SSD: If your primary drive is an older Hard Disk Drive (HDD) instead of a Solid State Drive (SSD), your system will feel significantly slower in general tasks and loading times. Comparing your specs to software requirements or general modern standards helps diagnose performance issues.
    • Q5: What’s the difference between 32-bit and 64-bit Windows?                                      This refers to the architecture of your operating system and processor. A 64-bit system can process more data at once and access larger amounts of RAM (typically more than 4GB) compared to a 32-bit system. Most modern Windows PCs run a 64-bit version of Windows and have a 64-bit processor. You can find this under “System type” in the Settings “About” section or System Information.
  • How to Switch Between Windows Using Keyboard

    How to Switch Between Windows Using Keyboard

    In today’s multitasking world, having multiple applications and windows open simultaneously is the norm. Whether you’re juggling a web browser, a word processor, a spreadsheet, and an email client, constantly moving your mouse to click on the taskbar can be inefficient and slow down your workflow. This is where keyboard shortcuts become incredibly powerful, allowing you to switch between windows quickly and seamlessly without ever lifting your hands from the keyboard.

    Learning these shortcuts is a fundamental step toward becoming more productive on your Windows PC (both Windows 11 and Windows 10). They save time, reduce strain, and make navigating your digital workspace feel much more fluid. From quick toggles to visual overviews, Windows offers several built-in methods to help you manage your open applications.

    Why Use Keyboard Shortcuts to Switch Windows?

    • Speed and Efficiency: Quickly jump between applications without interrupting your typing flow.
    • Ergonomics: Reduces reliance on the mouse, potentially lessening wrist strain over time.
    • Accessibility: Offers an alternative navigation method for users who prefer or require keyboard-centric control.
    • Professionalism: Demonstrates proficiency and control over your operating system.

    Method 1: Alt + Tab (The Classic Window Switcher)

    This is perhaps the most well-known and widely used keyboard shortcut for switching between windows. It has been a staple in Windows operating systems for decades, offering a quick visual preview of open applications.

    How to Use:

    1. Hold down the Alt key.
    2. Press the Tab key once. You will see a small overlay window appear in the center of your screen, displaying thumbnails of all your open applications and windows. The currently active window will have a highlighted border.
    3. Continue pressing Tab (while holding Alt) to cycle through the open windows. Each press of Tab moves the highlight to the next window in the sequence.
    4. Release the Alt key when the desired window is highlighted. That window will then become active.
    • Tip for Reverse Cycling: To cycle backward through the windows, hold Alt + Shift and then press Tab.
    • User Insight: I’ve been using Alt + Tab for so long it’s almost second nature. It’s incredibly useful when you have just a few windows open and want to quickly jump between them without looking at the taskbar.

    Method 2: Windows Key + Tab (Task View – Modern Window Management)

    The Windows Key + Tab shortcut opens Task View, a more modern and visually rich way to manage your open windows, virtual desktops, and even review your activity history. This feature was introduced in Windows 10 and has been refined in Windows 11.

    How to Use:

    1. Press Windows key + Tab simultaneously. This will open Task View, showing larger thumbnails of all your open windows.
    2. Navigate with Arrow Keys: Use the arrow keys (Up, Down, Left, Right) on your keyboard to navigate between the different window thumbnails.
    3. Select a Window: Once the desired window is highlighted, press Enter to make it active.
    4. Close a Window: While in Task View, you can also hover over a window thumbnail with the mouse (or navigate to it with arrow keys) and press the Delete key (or click the ‘X’ icon) to close that window without switching to it.
    • Working with Virtual Desktops in Task View:
      • At the bottom of the Task View screen, you’ll see thumbnails for your Virtual Desktops (e.g., “Desktop 1,” “Desktop 2”).
      • You can use the arrow keys to navigate to these desktop thumbnails.
      • To create a new Virtual Desktop, navigate to the “New desktop” tile and press Enter.
      • To move an open window to a different Virtual Desktop, drag its thumbnail with your mouse to the desired desktop thumbnail at the bottom, or select the window thumbnail with arrow keys, then right-click (or press the menu key) and choose “Move to” > “New desktop” or an existing desktop.

    Method 3: Windows Key + Number (Direct Taskbar Access)

    This is a lesser-known but highly efficient shortcut for launching or switching to applications pinned to your taskbar.

    How to Use:

    1. Identify Taskbar Position: Look at your taskbar (usually at the bottom of the screen). Each pinned application has a numerical position, starting from 1 for the leftmost icon.
    2. Press Windows Key + the corresponding number. For example:
      • Windows key + 1 will open or switch to the first application on your taskbar.
      • Windows key + 2 will open or switch to the second application.
      • And so on.
    3. Cycling Through Multiple Windows of the Same App: If you have multiple windows open for the same application (e.g., three Word documents), repeatedly pressing Windows key + Number for that application will cycle through its open windows.
    • Tip: This shortcut is fantastic for frequently used apps like your web browser or File Explorer. If your browser is the first icon, Win + 1 gets you there instantly.

    Method 4: Alt + Esc (Cycling Windows in Order of Opening)

    This shortcut cycles through open windows in the order they were opened, rather than the Alt + Tab overlay. It’s less common but can be useful in specific scenarios.

    How to Use:

    1. Hold down the Alt key.
    2. Press the Esc key repeatedly. Each press will immediately switch to the next open window in the order they were launched or last active, without showing a preview overlay.

    Method 5: Windows Key + D (Show/Hide Desktop)

    While not directly for switching between windows, this shortcut is invaluable for quickly revealing your desktop and then returning to your previous applications.

    How to Use:

    1. Press Windows key + D simultaneously. All open windows will minimize, revealing your desktop.
    2. Press Windows key + D again. All previously minimized windows will restore to their original positions.

    Method 6: Windows Key + Arrow Keys (Snap Assist)

    This isn’t for switching, but for efficiently arranging windows on your screen, which can make it easier to see and work with multiple applications simultaneously.

    How to Use:

    1. Select a window you want to move.
    2. Press Windows key + Left Arrow: Snaps the window to the left half of the screen.
    3. Press Windows key + Right Arrow: Snaps the window to the right half of the screen.
    4. Press Windows key + Up Arrow: Maximizes the window. If already snapped left/right, it will snap to the top quarter/half.
    5. Press Windows key + Down Arrow: Minimizes the window. If snapped, it will restore down or snap to the bottom quarter/half.

    Customizing and Practicing Shortcuts

    • Muscle Memory: The key to mastering these shortcuts is consistent practice. Try to integrate them into your daily workflow.
    • Explore Further: Windows has hundreds of keyboard shortcuts. As you become comfortable with these, explore others for tasks like launching apps, taking screenshots, or navigating File Explorer.
    • Sticky Keys: If you find holding down multiple keys difficult, explore Accessibility options in Windows Settings for features like Sticky Keys, which allows you to press modifier keys (like Alt, Ctrl, Shift, Windows key) sequentially.

    By dedicating a little time to learning and practicing these keyboard shortcuts, you’ll transform the way you interact with Windows, making your computing experience significantly faster and more intuitive.

    Frequently Asked Questions (FAQ)

    Q: What is the fastest way to switch between two open windows in Windows?

    The fastest way to switch between two open windows is typically by using Alt + Tab. If you have only two windows open, pressing Alt + Tab once and releasing Alt will instantly switch between them.

    Q: What is the “Windows Key” on my keyboard?

    The Windows Key is usually located between the Ctrl and Alt keys on the left side of your keyboard (and sometimes on the right). It has the Windows logo on it. It’s often used in combination with other keys for various keyboard shortcuts.

    Q: What’s the difference between Alt + Tab and Windows Key + Tab?

    Alt + Tab provides a simple overlay of open window thumbnails, primarily for quick switching between applications. Windows Key + Tab opens Task View, which is a more comprehensive interface that shows larger window thumbnails, allows you to manage virtual desktops, and view your activity history. Task View offers more control and visual feedback.

    Q: Can I use keyboard shortcuts to close windows without clicking the ‘X’ button?

    Yes! To close the currently active window using a keyboard shortcut, press Alt + F4. If you are on the desktop, pressing Alt + F4 will bring up the Shut Down Windows dialog box.

    Q: Is there a shortcut to minimize all windows and show the desktop?

    Yes, press Windows key + D (for Desktop). This shortcut will minimize all open windows and show your desktop. Pressing Windows key + D again will restore all the minimized windows to their previous positions.

    Q: Do these shortcuts work on both Windows 10 and Windows 11?

    Yes, the core keyboard shortcuts like Alt + Tab, Windows key + Tab, Windows key + D, and Alt + F4 work identically or very similarly across both Windows 10 and Windows 11. Microsoft maintains consistency for these fundamental actions.

    Q: What if a keyboard shortcut doesn’t work?

    If a keyboard shortcut isn’t working:

    • Ensure you are pressing all keys simultaneously and correctly.
    • Check if your keyboard is functioning properly (try typing in a text editor).
    • Restart your computer; sometimes temporary glitches can prevent shortcuts from working.
    • Ensure no other software is remapping or interfering with those specific key combinations.
  • How to Use Microsoft Word and Excel on Laptop

    How to Use Microsoft Word and Excel on Laptop

    Microsoft Word and Microsoft Excel are two of the most widely used and powerful applications within the Microsoft Office suite. Word is a word processor essential for creating documents, reports, letters, and more, while Excel is a spreadsheet program designed for organizing, analyzing, and visualizing data, from budgets to complex datasets. Whether you’re a student, professional, or just managing personal tasks, understanding how to effectively use these programs on your laptop is a fundamental computer skill.

    This guide will provide a clear, step-by-step introduction to the basic functionalities of both Word and Excel, helping you get started with creating, editing, and saving your work. We’ll cover their core interfaces, key features, and common tasks, applicable to recent versions like Microsoft 365 (formerly Office 365), Office 2019, Office 2021, and beyond.

    Getting Started: Opening and Understanding the Interface

    Both Word and Excel share a similar modern Microsoft Office interface, making it easier to switch between them once you grasp the basics.

    1. Opening Word or Excel:
      • Start Menu: Click the Start button (Windows icon) in the bottom-left corner of your laptop’s screen. Look for “Word” or “Excel” in the app list, or type their names into the search bar and click the icon.
      • Desktop Shortcut: If you have a shortcut icon on your Desktop, double-click it.
      • Taskbar: If pinned to your taskbar, click the icon once.
    2. The Ribbon Interface:
      • Once opened, you’ll see the Ribbon at the top. This is the main control center, organized into tabs (e.g., Home, Insert, Page Layout, Formulas, Data).
      • Each tab contains groups of related tools and commands (e.g., Font group, Paragraph group, Cells group).
      • Contextual Tabs: Some tabs (like “Table Tools” or “Picture Format”) only appear when you select a specific object (e.g., a table, an image), providing relevant tools.
    3. Quick Access Toolbar:
      • Located above the Ribbon (usually top-left). It contains frequently used commands like Save, Undo, and Redo. You can customize this.
    4. Backstage View (File Tab):
      • Clicking the “File” tab (usually the leftmost tab) takes you to the Backstage view. This is where you manage your documents/workbooks: New, Open, Save, Save As, Print, Share, Export, etc.

    Part 1: How to Use Microsoft Word

    Microsoft Word is your go-to application for all text-based documents.

    Core Functionality: Creating and Saving a Document

    1. Start a New Document:
      • When you open Word, you’ll often be presented with a choice: “Blank document” or various templates. For beginners, start with a “Blank document.”
    2. Typing Text:
      • The blinking vertical line on the page is the cursor. This indicates where your text will appear. Just start typing!
    3. Basic Navigation:
      • Use the arrow keys on your keyboard to move the cursor up, down, left, or right.
      • Use the mouse to click anywhere on the page to move the cursor to that location.
    4. Saving Your Document:
      • First Save (Save As):
        • Click the “File” tab, then select “Save As.”
        • Click “Browse” or “This PC” to choose a location (e.g., your “Documents” folder).
        • In the “File name” box, type a descriptive name for your document (e.g., My First Letter).
        • Click “Save.”
      • Subsequent Saves (Save):
        • After the initial save, just click the Save icon (floppy disk) on the Quick Access Toolbar or press Ctrl + S (a common keyboard shortcut) to quickly update your saved file.
        • User Insight: Saving frequently is paramount! I’ve learned the hard way that a sudden power cut can erase hours of unsaved work. Ctrl + S is practically muscle memory for me now.

    Basic Formatting and Editing

    These tools are found mainly on the “Home” tab of the Ribbon.

    1. Selecting Text:
      • Click and drag your mouse over the text you want to format.
      • Double-click a word to select it.
      • Triple-click a paragraph to select the whole paragraph.
    2. Font Formatting: (In the “Font” group)
      • Font: Change the typeface (e.g., Arial, Times New Roman).
      • Font Size: Make text larger or smaller.
      • Bold (B): Makes text darker.
      • Italic (I): Slants text.
      • Underline (U): Puts a line under text.
      • Font Color: Changes the color of the text.
    3. Paragraph Formatting: (In the “Paragraph” group)
      • Alignment: Left, Center, Right, Justify.
      • Bullet Points/Numbering: Create lists.
      • Line Spacing: Adjust space between lines of text.
    4. Copy, Cut, and Paste: (In the “Clipboard” group)
      • Select text, then click “Copy” (or Ctrl + C) to duplicate it.
      • Select text, then click “Cut” (or Ctrl + X) to remove it from its current spot.
      • Place your cursor where you want the text to appear, then click “Paste” (or Ctrl + V).

    Inserting Elements

    The “Insert” tab offers options to add various elements to your document.

    • Pictures: Click “Pictures” to insert an image from your computer. You can then resize and move it.
    • Tables: Click “Table” to insert a grid of rows and columns.
    • Page Numbers: Click “Page Number to add page numbering to your document.

    Part 2: How to Use Microsoft Excel

    Microsoft Excel is a spreadsheet program used for numerical data, calculations, and lists.

    Core Functionality: Entering Data and Saving a Workbook

    1. Understanding the Spreadsheet:
      • Workbook: An Excel file is called a workbook.
      • Worksheet: Each workbook can contain multiple worksheets (tabs at the bottom, e.g., Sheet1, Sheet2).
      • Cell: The intersection of a row and a column. This is where you enter data.
      • Column: Labeled with letters (A, B, C…).
      • Row: Labeled with numbers (1, 2, 3…).
      • Cell Address: A cell is identified by its column letter and row number (e.g., A1, B5).
    2. Entering Data:
      • Click on a cell to select it.
      • Type your text or number into the cell.
      • Press Enter to move to the cell below, or Tab to move to the cell to the right.
    3. Navigating Cells:
      • Use the arrow keys to move one cell at a time.
      • Use the mouse to click on any cell.
      • To go to a specific cell, type its address in the Name Box (left of the formula bar) and press Enter.
    4. Saving Your Workbook:
      • First Save (Save As):
        • Click the “File” tab, then select “Save As.”
        • Click “Browse” or “This PC” to choose a location (e.g., your “Documents” folder).
        • In the “File name” box, type a descriptive name (e.g., Monthly Budget).
        • Click “Save.”
      • Subsequent Saves (Save):
        • Click the Save icon (floppy disk) on the Quick Access Toolbar or press Ctrl + S.

    Basic Formatting and Data Entry

    These tools are found mainly on the “Home” tab of the Ribbon.

    1. Formatting Cells:
      • Select cells by clicking and dragging.
      • Font Group: Similar to Word, you can change font, size, bold, italic, underline, and color.
      • Alignment Group: Align text within cells (left, center, right, top, middle, bottom).
      • Number Group: Change the format of numbers (e.g., General, Number, Currency, Percentage, Date). Select cells, then choose from the dropdown. This is vital for calculations.
      • Merge & Center: Combines selected cells into one larger cell and centers the text. Useful for titles.
    2. Adjusting Column Width and Row Height:
      • Hover your mouse between two column letters (e.g., between A and B) until the cursor changes to a double-headed arrow. Click and drag to resize.
      • Double-click the line between two column letters to auto-fit the column to its contents.
      • The same applies to row numbers for row height.

    Performing Basic Calculations (Formulas)

    This is where Excel’s power truly shines. Formulas always start with an equals sign (=).

    1. Basic Addition/Subtraction/Multiplication/Division:
      • Type = in a cell.
      • Enter cell references and operators: + (add), – (subtract), * (multiply), / (divide).
      • Example: In cell C1, type =A1+B1 to add the values in A1 and B1. Press Enter.
    2. Using Basic Functions:
      • SUM: Adds a range of numbers. Example: =SUM(A1:A10) adds numbers from A1 to A10.
      • AVERAGE: Calculates the average of a range. Example: =AVERAGE(B1:B20).
      • MIN/MAX: Finds the smallest/largest number in a range. Example: =MIN(C1:C50).
      • To enter a function:
        • Type = followed by the function name (e.g., SUM).
        • Type an opening parenthesis (.
        • Click and drag to select the range of cells you want to include in the calculation.
        • Type a closing parenthesis ).
        • Press Enter.
      • AutoSum: The AutoSum button (looks like a sigma Σ on the Home tab, in the “Editing” group) is a quick way to insert the SUM, AVERAGE, etc., functions. Select the cell where you want the total, click AutoSum, and it will often guess the correct range.
    3. Filling Data (Fill Handle):
      • When you select a cell, a small green square appears in the bottom-right corner (fill handle).
      • To copy content or formulas: Click and drag the fill handle down or across. Excel will intelligently adjust cell references for formulas.
      • To create series: Type 1 in A1 and 2 in A2. Select both, then drag the fill handle down to auto-fill 3, 4, 5….

    Best Practices for Word and Excel Use

    • Keyboard Shortcuts: Learn common shortcuts (Ctrl+S for Save, Ctrl+C for Copy, Ctrl+V for Paste, Ctrl+Z for Undo, Ctrl+B for Bold) to work more efficiently.
    • Templates: Use built-in templates (available when you create a “New” document/workbook) for quick starts on common tasks like resumes, invoices, or calendars.
    • Spell Check/Grammar Check: Use Word’s built-in tools (Review tab) to catch errors.
    • Proofread: Always proofread your work before sharing or printing.
    • Organize Your Files: Save your documents and workbooks in logical folders on your laptop (e.g., a “Documents” folder, a “Budget” folder).
    • Cloud Storage: Consider saving your files to OneDrive (Microsoft’s cloud storage) for automatic backups and access from other devices.

    Mastering Microsoft Word and Excel opens up a world of possibilities for personal and professional productivity. Start with the basics, practice regularly, and gradually explore more advanced features as your confidence grows.

    Frequently Asked Questions (FAQ)

    Q: Do I need to buy Microsoft Office to use Word and Excel on my laptop?

    Typically, yes, to get the full desktop versions of Microsoft Word and Excel, you would need a subscription to Microsoft 365 or a one-time purchase of Office Home & Student/Business. However, Microsoft also offers free web-based versions of Word and Excel (called Word for the web and Excel for the web) that you can access through a web browser with a free Microsoft account, offering basic functionality.

    Q: What is the “Ribbon” in Word and Excel?

    The Ribbon is the primary interface element at the top of the Word and Excel windows. It contains all the tools and commands, organized into tabs (like Home, Insert, Layout) and then further into groups (like Font, Paragraph, Cells). It’s designed to make commands easily accessible.

    Q: How do I undo a mistake in Word or Excel?

    You can undo a mistake by clicking the Undo arrow icon (a left-curving arrow) on the Quick Access Toolbar (usually at the top-left of the window), or by pressing the common keyboard shortcut Ctrl + Z. You can click/press it multiple times to undo several previous actions.

    Q: What’s the difference between “Save” and “Save As”?

    “Save As” is used the first time you save a new document or workbook, or when you want to save an existing file with a new name or to a different location. “Save” is used for subsequent saves to update the existing file with your latest changes, without prompting for a new name or location.

    Q: Can Word and Excel files be opened on other computers, even if they don’t have Office installed?

    Yes, generally. While the full desktop versions of Word and Excel offer the best experience, you can open .docx (Word) and .xlsx (Excel) files using:

    • Free web versions of Word/Excel (with a Microsoft account).
    • Free office suites like LibreOffice or Google Docs (which can open and often save in Microsoft Office formats).
    • Microsoft Office Mobile apps on phones/tablets. However, complex formatting or advanced features might not display perfectly on non-Microsoft Office programs.

    Q: How do I perform a basic calculation, like adding numbers, in Excel?

    To perform a basic calculation in Excel, you start by typing an equals sign (=) in the cell where you want the result. Then, you can use cell references and operators. For example, to add the numbers in cells A1 and B1 and show the result in C1, you would type =A1+B1 into cell C1 and press Enter. For adding a range of numbers, you can use the SUM function, like =SUM(A1:A10).

  • how to fix black screen issue on Samsung Smart TV

    how to fix black screen issue on Samsung Smart TV

    Experiencing a black screen on your Samsung Smart TV can be incredibly frustrating. One moment you’re enjoying your favorite show, the next, you’re staring at a blank display, perhaps with sound still playing, or nothing at all. This common issue can stem from various sources, ranging from simple cable problems to more complex internal hardware malfunctions.

    This comprehensive “how-to” guide will walk you through a series of troubleshooting steps, starting with the easiest and most common fixes, to help you diagnose and resolve the black screen issue on your Samsung Smart TV.

    Understanding the Black Screen Issue

    A black screen on a Samsung Smart TV can manifest in a few ways:

    • No Picture, But Sound: This often points to an issue with the display panel itself, the backlights, or the T-Con board. The TV’s internal processing is still working, but the image isn’t being generated or shown.
    • No Picture, No Sound, Power Light On: This suggests a power delivery problem to the display components, or a main board issue that affects both video and audio output.
    • No Picture, No Sound, No Power Light: This indicates a complete power failure, possibly related to the power supply board, main board, or even the power outlet itself.
    • Flickering Black Screen: This could be due to a faulty cable, a loose connection, or sometimes an intermittent issue with the TV’s internal components or the source device.

    Regardless of the specific manifestation, a black screen is a common problem with various potential culprits.

    Method 1: The Simple Power Cycle (Soft Reset)

    This is the first and often most effective step for many electronic device issues, including the Samsung Smart TV black screen. A power cycle (also known as a soft reset or reboot) clears temporary glitches in the TV’s operating system (Tizen OS for Samsung Smart TVs).

    1. Turn off your Samsung TV using the remote control.
    2. Unplug the TV’s power cord from the wall outlet.
    3. Wait for at least 30 to 60 seconds. This allows any residual power to drain from the TV’s capacitors, ensuring a complete reset.
    4. Press and hold the power button on the TV itself (not the remote) for 15-30 seconds, if accessible. This helps drain any remaining power. (The physical power button is usually located on the bottom center or bottom right of the TV frame).
    5. Plug the power cord back in to the wall outlet.
    6. Turn on your TV using the remote control.

    Check if the picture has returned. If not, proceed to the next method.

    Method 2: Check All Connections and External Devices

    Loose cables or issues with connected external devices are frequent causes of a black screen.

    1. Check Power Cables:
      • Ensure the TV’s power cord is securely plugged into both the TV’s power input and the wall outlet.
      • Try plugging the TV into a different, known-working electrical outlet to rule out a faulty outlet or surge protector.
    2. Inspect HDMI/Input Cables:
      • Unplug and re-plug all HDMI cables and other input cables (e.g., component, composite, optical audio) from both the TV and the external devices (cable box, gaming console, Blu-ray player, soundbar, etc.).
      • Ensure the cables are fully seated and not loose.
      • Try a different HDMI port on your TV. Sometimes one port can go bad.
      • Try a different HDMI cable. Faulty or low-quality HDMI cables are a very common cause of signal issues. If you have a spare, swap it out.
    3. Check External Devices:
      • Turn off and unplug all external devices connected to your TV.
      • Plug in and turn on only one device at a time (e.g., just your cable box) and check if the TV displays a picture. This helps identify if a specific external device is causing the issue.
      • Ensure external devices are powered on and functioning correctly. Check their own power indicators.
      • Switch to the correct input source on your TV using the remote (e.g., HDMI1, HDMI2).

    If you get a picture with one device but not another, the problem lies with that specific external device or its cable.

    Method 3: Test with the TV’s Built-in Controls (No Remote)

    Sometimes the remote control or its batteries can be the culprit. Test the TV’s basic functionality using its physical buttons.

    1. Locate Physical Buttons: Most Samsung Smart TVs have physical buttons, usually on the bottom, side, or back panel. They might be touch-sensitive or small push-buttons. Look for a power button and possibly volume/channel buttons.
    2. Try Powering On/Off: Use the physical power button to turn the TV off and on.
    3. Change Input Source: If available, try cycling through input sources using the physical buttons.
    4. Check for Menu: Press the physical “Menu” or “Source” button to see if the TV’s on-screen menu appears. If the menu appears, it indicates the display panel is working, and the problem is likely with the input signal or a deeper software issue.

    Method 4: Perform a Hard Reset / Factory Reset (Last Resort for Software)

    A factory reset wipes all your TV’s settings, installed apps, and user data, returning it to its out-of-the-box state. This can resolve software glitches, corrupted settings, or firmware issues that might be causing the black screen. Only attempt this if you can see the TV’s menu on the screen. If the screen is completely black, you cannot perform a factory reset via the menu.

    1. Open Settings: Press the Home button on your Samsung remote, then navigate to Settings (gear icon).
    2. Navigate to General: Select General.
    3. Select Reset: Scroll down and select Reset.
    4. Enter PIN: You may be prompted to enter your PIN. The default is usually 0000.
    5. Confirm Reset: Select Reset again to confirm. Your TV will restart.

    Historical Context: The factory reset function has been a standard troubleshooting step across consumer electronics for decades. It’s a fundamental way to clear software states and configurations that might lead to unexpected behavior, including display issues.

    Method 5: Check Eco Solution Settings (Energy Saving)

    Some Samsung TVs have Eco Solution settings that can automatically turn off the screen or adjust brightness too aggressively, potentially leading to a perceived black screen.

    1. Open Settings: Press the Home button on your Samsung remote, then navigate to Settings.
    2. Navigate to System (or General > Eco Solution):
      • On some models, go to System, then Eco Solution.
      • On others, go to General, then Eco Solution.
    3. Disable Eco Features:
      • Look for settings like “Auto Power Off,” “Eco Sensor,” “Motion Lighting,” or “Energy Saving Mode.”
      • Disable or turn off these features one by one, or set them to a less aggressive setting.
      • Specifically check “Blank Screen” or “Picture Off” options if available.

    This can sometimes resolve issues where the TV mistakenly turns off its display.

    Method 6: Update TV Firmware

    Outdated firmware can sometimes lead to performance issues or bugs, including display problems. If your TV has an intermittent black screen or other strange behavior, a firmware update might help.

    Note: You need a working display to perform an update via the TV’s menu. If your screen is completely black, you might need to try a USB firmware update (see below).

    Updating via Internet:

    1. Open Settings: Press the Home button on your Samsung remote, then navigate to Settings.
    2. Navigate to Support: Select Support.
    3. Select Software Update: Choose Software Update.
    4. Select Update Now: Tap on Update Now. The TV will check for and install any available updates.

    Updating via USB (If Screen is Completely Black):

    If your screen is completely black and you can’t access the menu, a USB update might be your only option. This process is more involved and requires careful attention.

    1. Find Your TV Model Number: Locate the model number on the back of your TV (e.g., QN55Q80AAFXZA).
    2. Go to Samsung Support Website: Visit the official Samsung Support website for your region.
    3. Search for Your Model: Enter your TV’s model number in the search bar.
    4. Download Firmware: Find the “Firmware” or “Software & Drivers” section and download the latest firmware update file to your computer.
    5. Prepare USB Drive:
      • Format a USB flash drive (FAT32 is generally recommended).
      • Create a new folder on the USB drive named “upgrade_T-____” (replace the blank with the firmware file’s first few characters, check instructions on Samsung’s download page).
      • Extract the downloaded firmware file to this new folder on the USB drive. Do not change the folder or file names.
    6. Insert USB into TV: With the TV turned off, insert the USB drive into one of the TV’s USB ports.
    7. Power On TV: Turn on the TV. It should detect the USB and prompt you to start the update. Follow the on-screen instructions carefully. Do not turn off the TV during the update process.

    When to Call Samsung Support or a Professional

    If you’ve tried all the above troubleshooting steps and your Samsung Smart TV still has a black screen, it’s likely a hardware issue that requires professional attention. Common hardware failures leading to a black screen include:

    • Power Supply Board Failure: If there’s no power at all, or inconsistent power delivery to components.
    • Main Board (Motherboard) Failure: The main processing unit is faulty, affecting video and audio signals.
    • Backlight Failure: The most common cause of “no picture, but sound.” The LED backlights that illuminate the LCD panel have failed.
    • T-Con Board (Timing Controller Board) Failure: This board processes the video signal before it’s sent to the display panel.
    • Display Panel Failure: The actual LCD or OLED panel is damaged. This is often the most expensive repair.

    Contact Samsung Support: Provide them with your TV model number and a detailed description of the troubleshooting steps you’ve already performed. They can advise on warranty coverage, repair options, or recommend authorized service centers.

    Consider a Local TV Repair Shop: If your TV is out of warranty, a local, reputable TV repair shop might offer a more cost-effective solution than Samsung’s official service, especially for common issues like backlight replacement.

    Conclusion

    A black screen on your Samsung Smart TV can be alarming, but many common culprits can be fixed with basic troubleshooting steps. Starting with a simple power cycle, checking all cables and external devices, and then delving into TV settings and potential firmware updates covers the majority of user-resolvable issues. If these steps don’t bring your picture back, it’s a strong indication of a hardware problem requiring professional diagnosis and repair.

    FAQ

    Q1: My Samsung TV has sound but no picture. What does that mean?

    If your Samsung Smart TV has sound but a black screen (no picture), it typically indicates that the TV’s audio processing is working, but there’s a problem with the display components. The most common causes are a backlight failure (the LEDs that illuminate the screen), a faulty T-Con board (which processes the video signal to the panel), or in rare cases, an issue with the display panel itself.

    Q2: How do I hard reset my Samsung TV if the screen is black and I can’t see the menu?

    If your Samsung TV screen is completely black and you cannot see the menu, you cannot perform a software factory reset via the menu. The closest you can get to a “hard reset” in this scenario is a power cycle: unplug the TV from the wall for 30-60 seconds, press and hold the TV’s physical power button for 15-30 seconds (if available), then plug it back in and try turning it on.

    Q3: Can a faulty HDMI cable cause a black screen on my Samsung Smart TV?

    Yes, absolutely. A damaged, loose, or low-quality HDMI cable is a very common cause of a black screen or intermittent picture issues. Always try swapping out the HDMI cable with a known working one and testing different HDMI ports on your Samsung TV and external device.

    Q4: What is a “power cycle” and how does it fix a black screen?

    A power cycle (or soft reset/reboot) involves completely removing power from an electronic device, typically by unplugging it, for a short period (e.g., 30-60 seconds). This drains residual electrical charge and clears any temporary software glitches or memory errors that might be causing the black screen or other malfunctions. It’s a fundamental first troubleshooting step.

    Q5: My Samsung TV turns on (power light is on) but stays black. Is it broken?

    Not necessarily broken beyond repair, but it indicates a specific type of problem. If the power light is on but the screen remains black with no picture or sound, it usually points to an issue with the power supply board (which provides power to all internal components), the main board (where the core processing happens), or a more severe backlight failure. These often require professional diagnosis and repair.

    Q6: Can a software update fix a black screen on my Samsung TV?

    It depends on the cause. If the black screen is due to a software bug, corrupted firmware, or an incompatibility issue, a firmware update could potentially resolve it. However, if the screen is completely black and you cannot access the TV’s menu, updating via the internet won’t be possible. You might attempt a USB firmware update as a last resort, but if it’s a hardware fault, a software update won’t help.

  • How to Enable and Use Clipboard History in Windows

    How to Enable and Use Clipboard History in Windows

    Have you ever found yourself needing to paste multiple items, only to realize Windows’ traditional clipboard only remembers the last thing you copied? That frustrating moment of constantly switching back and forth to copy-paste is a thing of the past thanks to Clipboard History in Windows. This incredibly useful feature, introduced in Windows 10 (version 1809 and later) and available in Windows 11, allows you to access a list of recently copied text and images. This guide will show you how to enable it and master its use, revolutionizing your workflow.

    What is Clipboard History?

    Traditional Windows clipboard functionality allows you to copy one item (text or image) at a time. When you copy something new, the previous item is overwritten. Clipboard History changes this by storing up to 25 of your most recent copied items. This means you can copy several pieces of text or images in a row and then choose which one to paste later, without having to re-copy. It’s a massive time-saver for anyone who deals with a lot of copy-pasting, from coding to writing emails.

    How to Enable Clipboard History

    Clipboard History isn’t enabled by default on all Windows installations, but turning it on is a quick process.

    Step 1: Open Windows Settings

    There are a few ways to open Settings:

    • Start Menu: Click the Start button and then click the Settings gear icon.
    • Keyboard Shortcut: Press Windows Key + I simultaneously.

    Step 2: Navigate to Clipboard Settings

    1. In the Settings window, click on “System.”
    2. In the left-hand menu, scroll down and click on “Clipboard.”

    Step 3: Toggle On Clipboard History

    1. Under the “Clipboard” section, you’ll see a toggle switch labeled “Clipboard history.”
    2. Click this toggle to turn it “On.”

    Once the toggle is on, Clipboard History is enabled, and Windows will start saving everything you copy.

    How to Use Clipboard History

    Enabling the feature is only half the battle. Knowing how to access and utilize your clipboard history is where the real magic happens.

    Accessing the Clipboard History Panel:

    1. Whenever you want to paste an item from your history, instead of pressing Ctrl + V (the standard paste command), press Windows Key + V.
    2. A small pop-up panel will appear, displaying a list of your recently copied items. These will be shown in chronological order, with the most recently copied item at the top.

    Pasting an Item from History:

    1. From the Clipboard History panel (opened with Windows Key + V), simply click on the item you wish to paste.
    2. The selected item will be immediately pasted into your current application.

    Pinning Items in Clipboard History:

    Sometimes you copy items that you’ll need to use repeatedly throughout your session or even across reboots. Clipboard History allows you to “pin” these items so they aren’t removed from the history, even if you clear it or restart your computer.

    1. Open the Clipboard History panel (Windows Key + V).
    2. Hover your mouse over the item you want to pin.
    3. Click the pin icon (it looks like a thumbtack) that appears next to the item.
    4. Pinned items will remain in your history until you unpin them.

    Unpinning Items:

    1. Open the Clipboard History panel (Windows Key + V).
    2. Hover over a pinned item.
    3. Click the unpin icon (the thumbtack again) to unpin it.

    Deleting Individual Items from History:

    If your clipboard history gets cluttered, or if you’ve copied sensitive information you don’t want stored, you can delete individual entries.

    1. Open the Clipboard History panel (Windows Key + V).
    2. Hover over the item you want to delete.
    3. Click the ellipsis (three dots) button that appears next to the item.
    4. Select “Delete” from the options.

    Clearing All Clipboard History:

    To clear all unpinned items from your clipboard history (pinned items will remain), you have two options:

    Option 1: From the Clipboard History Panel:

    1. Open the Clipboard History panel (Windows Key + V).
    2. Click the “Clear all” button at the top right of the panel.

    Option 2: From Settings:

    1. Go to Settings > System > Clipboard.
    2. Under “Clear clipboard data,” click the “Clear” button.

    Important Note on Clearing: Clearing the history only affects items not pinned. Pinned items are designed to persist.

    Synchronizing Clipboard Across Devices (Cloud Sync)

    Windows Clipboard History also includes an optional feature to synchronize your clipboard content across your other Windows devices, as long as you’re signed in with the same Microsoft account. This is incredibly useful if you work across a desktop and a laptop.

    To Enable Cloud Sync:

    1. Go to Settings > System > Clipboard.
    2. Under “Sync across your devices,” toggle the switch to “On.”
    3. You might be prompted to verify your Microsoft account.

    How Cloud Sync Works:

    • Once enabled, items you copy on one synced Windows device will be available in the Clipboard History panel on your other synced devices.
    • Only text and smaller images will sync. Larger files or complex formats might not sync.
    • For security reasons, sensitive information like passwords should be handled with care when cloud sync is enabled. It’s generally not recommended to copy passwords to the clipboard if sync is active.

    Troubleshooting Clipboard History

    While Clipboard History is reliable, you might encounter minor issues.

    • Clipboard History Not Showing Up:
      • Check Enablement: Double-check that “Clipboard history” is toggled “On” in Settings.
      • Windows Version: Ensure you are running Windows 10 version 1809 or newer, or Windows 11.
      • Restart Explorer: Sometimes, restarting Windows Explorer can resolve minor glitches. Open Task Manager (Ctrl + Shift + Esc), find “Windows Explorer” in the Processes tab, right-click, and select “Restart.”
    • Items Not Sticking in History:
      • Limit Reached: Remember the 25-item limit for unpinned items.
      • Restarted PC: Unpinned items are cleared on reboot. Pin important items.
    • Sync Not Working:
      • Microsoft Account: Ensure you’re signed in with the same Microsoft account on all devices.
      • Sync Toggle: Verify “Sync across your devices” is enabled on all relevant devices.
      • Network Connection: Ensure both devices have an active internet connection.

    Conclusion

    The Clipboard History feature in Windows is a small but mighty enhancement that significantly improves productivity. By enabling it and understanding how to use its various functions – from simple pasting to pinning and syncing – you can streamline your copy-paste workflow and save valuable time. It’s one of those features that once you start using, you’ll wonder how you ever managed without it.

    SEO Meta Description: Enable and use Clipboard History in Windows! Learn how to access, paste from, pin items, and even sync your clipboard across devices for enhanced productivity.

    How to Enable and Use Clipboard History in Windows

    Have you ever found yourself needing to paste multiple items, only to realize Windows’ traditional clipboard only remembers the last thing you copied? That frustrating moment of constantly switching back and forth to copy-paste is a thing of the past thanks to Clipboard History in Windows. This incredibly useful feature, introduced in Windows 10 (version 1809 and later) and available in Windows 11, allows you to access a list of recently copied text and images. This guide will show you how to enable it and master its use, revolutionizing your workflow.

    What is Clipboard History?

    Traditional Windows clipboard functionality allows you to copy one item (text or image) at a time. When you copy something new, the previous item is overwritten. Clipboard History changes this by storing up to 25 of your most recent copied items. This means you can copy several pieces of text or images in a row and then choose which one to paste later, without having to re-copy. It’s a massive time-saver for anyone who deals with a lot of copy-pasting, from coding to writing emails.

    How to Enable Clipboard History

    Clipboard History isn’t enabled by default on all Windows installations, but turning it on is a quick process.

    Step 1: Open Windows Settings

    There are a few ways to open Settings:

    • Start Menu: Click the Start button and then click the Settings gear icon.
    • Keyboard Shortcut: Press Windows Key + I simultaneously.

    Step 2: Navigate to Clipboard Settings

    1. In the Settings window, click on “System.”
    2. In the left-hand menu, scroll down and click on “Clipboard.”

    Step 3: Toggle On Clipboard History

    1. Under the “Clipboard” section, you’ll see a toggle switch labeled “Clipboard history.”
    2. Click this toggle to turn it “On.”

    Once the toggle is on, Clipboard History is enabled, and Windows will start saving everything you copy.

    How to Use Clipboard History

    Enabling the feature is only half the battle. Knowing how to access and utilize your clipboard history is where the real magic happens.

    Accessing the Clipboard History Panel:

    1. Whenever you want to paste an item from your history, instead of pressing Ctrl + V (the standard paste command), press Windows Key + V.
    2. A small pop-up panel will appear, displaying a list of your recently copied items. These will be shown in chronological order, with the most recently copied item at the top.

    Pasting an Item from History:

    1. From the Clipboard History panel (opened with Windows Key + V), simply click on the item you wish to paste.
    2. The selected item will be immediately pasted into your current application.

    Pinning Items in Clipboard History:

    Sometimes you copy items that you’ll need to use repeatedly throughout your session or even across reboots. Clipboard History allows you to “pin” these items so they aren’t removed from the history, even if you clear it or restart your computer.

    1. Open the Clipboard History panel (Windows Key + V).
    2. Hover your mouse over the item you want to pin.
    3. Click the pin icon (it looks like a thumbtack) that appears next to the item.
    4. Pinned items will remain in your history until you unpin them.

    Unpinning Items:

    1. Open the Clipboard History panel (Windows Key + V).
    2. Hover over a pinned item.
    3. Click the unpin icon (the thumbtack again) to unpin it.

    Deleting Individual Items from History:

    If your clipboard history gets cluttered, or if you’ve copied sensitive information you don’t want stored, you can delete individual entries.

    1. Open the Clipboard History panel (Windows Key + V).
    2. Hover over the item you want to delete.
    3. Click the ellipsis (three dots) button that appears next to the item.
    4. Select “Delete” from the options.

    Clearing All Clipboard History:

    To clear all unpinned items from your clipboard history (pinned items will remain), you have two options:

    Option 1: From the Clipboard History Panel:

    1. Open the Clipboard History panel (Windows Key + V).
    2. Click the “Clear all” button at the top right of the panel.

    Option 2: From Settings:

    1. Go to Settings > System > Clipboard.
    2. Under “Clear clipboard data,” click the “Clear” button.

    Important Note on Clearing: Clearing the history only affects items not pinned. Pinned items are designed to persist.

    Synchronizing Clipboard Across Devices (Cloud Sync)

    Windows Clipboard History also includes an optional feature to synchronize your clipboard content across your other Windows devices, as long as you’re signed in with the same Microsoft account. This is incredibly useful if you work across a desktop and a laptop.

    To Enable Cloud Sync:

    1. Go to Settings > System > Clipboard.
    2. Under “Sync across your devices,” toggle the switch to “On.”
    3. You might be prompted to verify your Microsoft account.

    How Cloud Sync Works:

    • Once enabled, items you copy on one synced Windows device will be available in the Clipboard History panel on your other synced devices.
    • Only text and smaller images will sync. Larger files or complex formats might not sync.
    • For security reasons, sensitive information like passwords should be handled with care when cloud sync is enabled. It’s generally not recommended to copy passwords to the clipboard if sync is active.

    Troubleshooting Clipboard History

    While Clipboard History is reliable, you might encounter minor issues.

    • Clipboard History Not Showing Up:
      • Check Enablement: Double-check that “Clipboard history” is toggled “On” in Settings.
      • Windows Version: Ensure you are running Windows 10 version 1809 or newer, or Windows 11.
      • Restart Explorer: Sometimes, restarting Windows Explorer can resolve minor glitches. Open Task Manager (Ctrl + Shift + Esc), find “Windows Explorer” in the Processes tab, right-click, and select “Restart.”
    • Items Not Sticking in History:
      • Limit Reached: Remember the 25-item limit for unpinned items.
      • Restarted PC: Unpinned items are cleared on reboot. Pin important items.
    • Sync Not Working:
      • Microsoft Account: Ensure you’re signed in with the same Microsoft account on all devices.
      • Sync Toggle: Verify “Sync across your devices” is enabled on all relevant devices.
      • Network Connection: Ensure both devices have an active internet connection.

    Conclusion

    The Clipboard History feature in Windows is a small but mighty enhancement that significantly improves productivity. By enabling it and understanding how to use its various functions – from simple pasting to pinning and syncing – you can streamline your copy-paste workflow and save valuable time. It’s one of those features that once you start using, you’ll wonder how you ever managed without it.

  • How to Transfer files from Samsung Phone to Laptop Without Cable

    How to Transfer files from Samsung Phone to Laptop Without Cable

    Gone are the days when you absolutely needed a USB cable to move files between your Samsung phone and your laptop. Thanks to advancements in wireless technology and cloud services, you now have multiple convenient ways to transfer files from your Samsung phone to your laptop without a cable. This guide will explore the most popular and effective methods, ensuring your photos, documents, and videos make it safely to your computer.

    Why Transfer Files Wirelessly?

    • Convenience: No need to search for a cable or deal with tangled wires.
    • Speed (for some methods): For larger files, Wi-Fi-based transfers can often be faster than older USB standards.
    • Flexibility: Transfer files from anywhere, as long as you have an internet connection or are on the same local network.
    • Port Accessibility: Useful if your phone’s USB port is damaged or dirty.

    Essential Preparations

    Before attempting any wireless transfer, ensure the following:

    • Both Devices Charged: Your Samsung phone and laptop should have sufficient battery.
    • Stable Wi-Fi Connection: For most methods, both devices need to be connected to the same stable Wi-Fi network.
    • Software Installed/Updated: Ensure any necessary apps are installed on both devices and are up to date.
    • Sufficient Storage: Your laptop must have enough free space to receive the files.

    Method 1: Using Quick Share (Samsung’s Native Solution)

    Quick Share is Samsung’s proprietary file-sharing feature, similar to Apple’s AirDrop. It allows fast and easy transfers between Samsung Galaxy devices and, crucially, also to Windows PCs with the Quick Share for Windows app.

    What You’ll Need:

    • A Samsung Galaxy phone (running Android 10 or newer with One UI 2.1 or later).
    • A Windows PC (running Windows 10 64-bit or Windows 11).
    • The Quick Share for Windows app installed on your laptop (downloadable from the Microsoft Store).
    • Both devices with Wi-Fi and Bluetooth enabled.

    Step-by-Step:

    1. Install Quick Share on Your Laptop:
      • Open the Microsoft Store on your Windows laptop.
      • Search for “Quick Share” and install the official app.
      • Open the Quick Share app on your laptop. You may need to sign in with your Google account.
      • Set your Device Visibility preference (e.g., “Everyone,” “Only your contacts,” or “Your devices”). For easy transfer, “Everyone” or “Only your devices” (if logged into the same Google account) is recommended.
    2. On Your Samsung Phone:
      • Open your Gallery app, My Files app, or any app where you want to share content.
      • Select the photos, videos, documents, or entire folders you wish to transfer.
      • Tap the Share icon (looks like three connected dots or a standard share sheet icon).
      • Select “Quick Share” from the sharing options.
      • Your laptop’s name should appear under “Nearby devices.” Tap on it.
    3. Accept on Your Laptop:
      • A notification will pop up on your laptop, indicating an incoming Quick Share transfer.
      • Click “Accept” to receive the files.
    4. Access Files: The transferred files will typically be saved in your laptop’s Downloads folder, often within a “Quick Share” subfolder.

    Insight: Quick Share leverages both Wi-Fi Direct and Bluetooth to provide fast, convenient transfers, making it one of the most efficient methods for Samsung users.

    Method 2: Using Microsoft Phone Link (Formerly Your Phone App)

    Microsoft’s Phone Link app (pre-installed on Windows 10/11) allows deeper integration between your Samsung phone and PC, including photo sync and limited file transfer.

    What You’ll Need:

    • A Samsung phone.
    • A Windows PC (Windows 10 or 11).
    • The Phone Link app on your PC and the Link to Windows app on your Samsung phone (pre-installed on most recent Samsung devices).
    • Both devices connected to the same Wi-Fi network.

    Step-by-Step:

    1. Set Up Phone Link:
      • Open the Phone Link app on your Windows laptop.
      • Follow the on-screen instructions to link your Samsung phone. This usually involves scanning a QR code with the “Link to Windows” app on your phone and granting necessary permissions.
      • Ensure all features are enabled during setup.
    2. Transfer Photos (Automatic Sync):
      • Once linked, the Phone Link app will automatically sync your recent photos from your Samsung phone to your PC’s Phone Link application.
      • On your PC, open the Phone Link app and select the “Photos” tab.
      • You can view, copy, or “Save as” these photos to your laptop’s local storage. This typically syncs up to 2,000 recent photos.
    3. Limited File Transfer (Drag & Drop):
      • Phone Link offers a drag-and-drop feature for individual files.
      • From the “Apps” section in Phone Link on your PC, you can open your phone’s file manager and drag files to your desktop.
      • Limitations: This method has limitations (e.g., usually single files, certain file size limits, folders often not supported). For bulk transfers, other methods are better.

    Method 3: Using Cloud Storage Services (Google Drive, OneDrive, Dropbox, etc.)

    Cloud storage is a versatile method for transferring files between any device with an internet connection, regardless of brand.

    What You’ll Need:

    • A Samsung phone.
    • A laptop.
    • An account with a cloud storage provider (e.g., Google Drive, Microsoft OneDrive, Dropbox).
    • A stable internet connection on both devices.

    Step-by-Step:

    1. Upload Files from Your Samsung Phone:
      • Open the cloud storage app (e.g., Google Drive, OneDrive, Dropbox) on your Samsung phone.
      • Tap the “+” (plus) icon or “Upload.”
      • Select the files (photos, videos, documents) you want to transfer.
      • Confirm the upload. Wait for the upload to complete (this depends on your file size and internet speed).
    2. Download Files to Your Laptop:
      • On your laptop, open a web browser and go to the cloud storage service’s website (drive.google.com, onedrive.live.com, dropbox.com).
      • Sign in to your account.
      • Navigate to the folder where you uploaded your files.
      • Select the files you want to download. You can usually select multiple files or entire folders.
      • Click the “Download” button. The files will be saved to your laptop’s Downloads folder or a location you choose.

    Insight: Cloud storage is excellent for accessibility from anywhere, but it requires uploading and then downloading, which can be time-consuming for very large files or slow internet connections.

    Method 4: Using Bluetooth

    Bluetooth is a simple, cable-free option, but it’s generally much slower than Wi-Fi-based methods and best suited for smaller files.

    What You’ll Need:

    • A Samsung phone.
    • A laptop with Bluetooth enabled.
    • Both devices within close range.

    Step-by-Step:

    1. Pair Your Phone and Laptop (if not already paired):
      • On your Laptop (Windows): Go to Settings > Bluetooth & devices (or Devices > Bluetooth & other devices). Ensure Bluetooth is ON. Click “Add device” or “Add Bluetooth or other device” and select “Bluetooth.”
      • On your Samsung Phone: Swipe down from the top to open the Quick settings panel. Tap and hold the Bluetooth icon to go to Bluetooth settings. Make sure Bluetooth is ON and discoverable.
      • Your laptop’s name should appear under “Available devices” on your phone. Tap it to pair.
      • Confirm the pairing code on both devices if prompted.
    2. Send Files from Your Samsung Phone:
      • Open your My Files app, Gallery, or any app containing the file you want to transfer.
      • Select the file(s).
      • Tap the Share icon.
      • Select “Bluetooth” from the sharing options.
      • Select your paired laptop from the list of devices.
    3. Receive Files on Your Laptop:
      • On your Windows laptop, a notification should pop up indicating an incoming Bluetooth file transfer.
      • Click “Accept” or follow the prompts to receive the file.
      • The file will usually be saved in your laptop’s Documents or Downloads folder.
      • Note: On Windows, you might need to manually enable “Receive a file” before initiating the transfer from your phone. Go to Settings > Bluetooth & devices > Send or receive files via Bluetooth and then select “Receive files.”

    Method 5: Using Web-Based File Sharing Apps (e.g., SHAREit, Snapdrop/Sharedrop, Pushbullet)

    Various third-party applications offer wireless file transfer, some even web-based for cross-platform compatibility.

    What You’ll Need:

    • A Samsung phone.
    • A laptop.
    • Both devices connected to the same Wi-Fi network.
    • The chosen app installed on both devices, or simply a web browser for web-based solutions.

    Step-by-Step (General for App-Based – e.g., SHAREit/Xender):

    1. Install the App: Download and install the chosen file-sharing app (e.g., SHAREit, Xender, AirDroid) on both your Samsung phone (from Google Play Store) and your laptop (from their official website).
    2. Connect Devices:
      • Open the app on both devices.
      • Look for an option like “Connect to PC” or “Web Share.”
      • The app will typically generate a QR code to scan with your phone or provide an IP address to enter in your laptop’s browser.
      • Follow the app’s specific instructions to establish a connection.
    3. Transfer Files: Once connected, you can usually browse your phone’s files from your laptop’s app interface and initiate transfers.

    Step-by-Step (General for Web-Based – e.g., Snapdrop.net / Sharedrop.io):

    1. Open Website on Both Devices: On both your Samsung phone and your laptop, open a web browser and go to a web-based file sharing service (e.g., snapdrop.net or sharedrop.io).
    2. Automatic Connection: If both devices are on the same local network, they should automatically detect each other. You’ll see an icon representing your laptop on your phone’s screen and vice-versa.
    3. Transfer Files:
      • From Phone to Laptop: On your phone, tap the laptop’s icon. This will open your phone’s file picker. Select the files you want to send.
      • Accept on Laptop: On your laptop, a download prompt will appear for the incoming files. Accept the download.
      • From Laptop to Phone: On your laptop, drag and drop files onto the phone’s icon on the website, or click the icon to browse and select files.
      • Accept on Phone: A prompt will appear on your phone asking you to accept the incoming files.

    Insight: Web-based solutions are incredibly convenient as they don’t require app installation, making them great for quick, spontaneous transfers.

    By leveraging these cable-free methods, you can seamlessly transfer files from your Samsung phone to your laptop without a cable, making your digital life more efficient and convenient. Choose the method that best suits your needs, file size, and network setup.

  • How to Block Websites on Samsung Internet Browser

    How to Block Websites on Samsung Internet Browser

    Blocking websites on your Samsung Internet browser can be a useful way to improve productivity, ensure online safety for children, or simply avoid distracting content. While Samsung Internet doesn’t have a direct “block website” feature built into its core settings, it offers robust support for content blockers and integrates well with system-level parental controls. This guide will show you how to block websites on Samsung Internet Browser using various effective methods.

    Understanding Website Blocking Mechanisms

    Website blocking isn’t a one-size-fits-all solution. Different methods work at different levels:

    • Browser-level: Filters content directly within the Samsung Internet app.
    • App-level: Uses a third-party app to control access across the device or specific browsers.
    • System-level (Parental Controls/DNS): Blocks websites at a deeper level, affecting all browsers and apps on the device or even across your entire network.

    Let’s dive into the practical steps.

    1. Using Content Blockers (Ad Blockers with Blocking Capabilities)

    Samsung Internet supports third-party content blocking extensions. While primarily designed for ads, many of these also offer options to block specific websites or categories.

    • Step 1: Open Samsung Internet Browser.
      • Find and tap the Samsung Internet app icon on your phone.
    • Step 2: Access Extensions/Ad Blockers.
      • Tap the Menu icon (three horizontal lines) in the bottom right corner of the browser.
      • Tap on “Ad blockers” (or “Extensions” on older versions, then look for “Content blockers”).
    • Step 3: Download and Install a Content Blocker.
      • You’ll see a list of available ad blocker apps compatible with Samsung Internet (e.g., AdBlock for Samsung Internet, AdGuard, Crystal).
      • Tap the “Download” icon next to your preferred ad blocker. This will take you to the Galaxy Store or Google Play Store.
      • Install the chosen app.
    • Step 4: Activate the Content Blocker.
      • After installation, go back to the “Ad blockers” section in Samsung Internet settings (Menu > Ad blockers).
      • Toggle on the switch next to the newly installed ad blocker to activate it.
    • Step 5: Configure Website Blocking (Within the Ad Blocker App).
      • Now, open the newly installed ad blocker app (e.g., AdBlock, AdGuard) from your phone’s app drawer.
      • Many of these apps have their own settings where you can:
        • Add specific URLs to a blacklist: Look for options like “Blocked Websites,” “Custom filters,” or “Blacklist.” Enter the full URL (e.g., https://www.example.com) you wish to block.
        • Block by category: Some advanced blockers allow you to block entire categories of websites (e.g., adult content, gambling).
      • Save your changes within the ad blocker app. The changes should then apply to Samsung Internet.
    1. Utilizing Google Family Link (for Parental Controls)

    If you need to block websites for a child’s device, Google Family Link offers a robust, system-level solution that can affect Samsung Internet. This requires setting up a supervised Google account for the child.

    • Step 1: Set Up Google Family Link.
      • On your (parent’s) phone, download the Google Family Link app from the Play Store.
      • On your child’s Samsung phone, ensure they are signed in with a Google account managed by Family Link. If not, you’ll need to create one through the Family Link app.
    • Step 2: Access Content Restrictions for the Child’s Device.
      • On your (parent’s) phone, open the Family Link app.
      • Select your child’s profile.
      • Tap “Controls” (or “Content restrictions”).
      • Find the section for “Google Chrome” (even though you’re targeting Samsung Internet, Family Link’s web filters often apply broadly to all browsers on the device, or you can manage Samsung Internet specifically if it appears as an option).
    • Step 3: Block Specific Sites.
      • You’ll typically see options like:
        • “Try to block explicit sites”: Google attempts to filter out adult content.
        • “Only allow approved sites”: The most restrictive, blocking everything unless you manually approve it.
        • Within these options, look for a section like “Blocked sites” or “Manage sites.”
        • Tap “Add a website” and enter the URL you want to block.
      • Save your changes. These restrictions will apply to web Browse on your child’s Samsung phone, including Samsung Internet.
    1. Setting Up Private DNS (System-Wide Blocking)

    This is a more advanced method that can block websites at a network level, affecting all apps and browsers on your Samsung phone when connected to Wi-Fi or mobile data. It uses a DNS service that filters content.

    • Step 1: Choose a DNS Filtering Service.
      • Some reputable DNS services that offer content filtering include:
        • Cloudflare (1.1.1.1 for Families): Blocks malware, or malware + adult content.
        • OpenDNS Family Shield: Pre-configured to block adult content.
        • AdGuard DNS: Offers various filters, including ad-blocking and adult content.
        • Example AdGuard DNS for adult content: dns-family.adguard.com
    • Step 2: Configure Private DNS on Your Samsung Phone.
      • Go to Settings.
      • Tap on Connections.
      • Tap on More connection settings.
      • Tap on Private DNS.
      • Select “Private DNS provider hostname.”
      • Enter the hostname provided by your chosen DNS filtering service (e.g., dns-family.adguard.com for AdGuard’s family filter, or security.cloudflare-dns.com for Cloudflare’s security filter).
      • Tap “Save.”
    • Step 3: Test the Block.
      • Open Samsung Internet (or any browser) and try to access a website that should be blocked by your chosen DNS filter. If configured correctly, the site should be unreachable or show a blocked message.
    1. Using a Host File Editor (Requires Root – Not Recommended for Most Users)

    Modifying the host file is a traditional way to block websites by redirecting their domain names to a non-existent IP address. However, this method usually requires root access to your phone, which can void your warranty and carries security risks. This is not recommended for the average user.

    • Process (Briefly, for context):
      • Root your Samsung phone.
      • Install a host file editor app (from a trusted source).
      • Edit the /etc/hosts file to add entries like: 127.0.0.1 www.blockedwebsite.com
      • Save the file.

    Important Considerations:

    • No Single “Magic Button”: There isn’t one universal “block website” button directly within Samsung Internet itself for arbitrary websites. You need to use one of the methods above.
    • Effectiveness Varies: Content blockers are generally good for ads and some categories but might not block every single unwanted site without manual configuration. DNS filtering is broader but might block more than intended if not chosen carefully. Parental controls are comprehensive but require supervision.
    • Bypassing Blocks: Determined users, especially tech-savvy children, might find ways to bypass some blocks (e.g., using VPNs, different browsers, or resetting DNS settings).
    • Regular Review: Website lists and filtering services need to be reviewed periodically to ensure they are up-to-date and effective.

    By choosing the method that best fits your needs, you can effectively block websites on your Samsung Internet Browser, creating a safer or less distracting Browse environment on your Samsung phone.

  • How to Use a Second Monitor with Extended Display

    How to Use a Second Monitor with Extended Display

    Adding a second monitor to your computer setup is one of the most effective ways to boost your productivity and streamline your workflow. An extended display allows you to spread your applications, documents, and creative projects across multiple screens, giving you a vastly larger workspace than a single monitor provides. This comprehensive guide will walk you through the entire process of setting up and optimizing your dual-monitor configuration, covering both Windows and macOS operating systems.

    The Benefits of an Extended Display

    • Effortless Multitasking: Keep email, research, and video calls open simultaneously without switching tabs.
    • Increased Productivity: Reduce time spent toggling between apps.
    • Enhanced Organization: Manage windows and drag files between screens easily.
    • Immersive Experiences: Ideal for creatives, gamers, and developers.
    • Better Data Comparison: View two documents side-by-side comfortably.

    Step-by-Step Guide: Setting Up Your Second Monitor

    Step 1: Verify Hardware Compatibility

    • Computer Output Ports: HDMI, DisplayPort, DVI, VGA, USB-C/Thunderbolt.
    • Monitor Input Ports: Ensure compatibility with your video output.
    • Graphics Capability: Confirm your GPU supports multiple displays.
    • Cables: Use the correct type and length.

    Step 2: Connect the Monitor

    1. Power off your PC.
    2. Connect video cable to PC and monitor.
    3. Plug in and power on the monitor.
    4. Boot your computer.

    Step 3: Configure in Windows

    1. Right-click desktop > Display settings.
    2. Click Detect if the monitor isn’t recognized.
    3. Arrange displays to match physical layout.
    4. Under “Multiple displays,” select Extend these displays.
    5. Set your main display and adjust resolution/orientation.
    6. Click Keep changes to confirm.

    Step 4: Configure in macOS

    1. Connect your monitor to Mac.
    2. Go to Apple Menu > System Settings/Preferences > Displays.
    3. Use the Arrangement tab to align displays.
    4. Uncheck Mirror Displays.
    5. Set your primary display by moving the white menu bar.
    6. Adjust resolution as needed.

    Optimizing Your Extended Display Setup

    • Snap Assist (Windows): Snap windows by dragging or using Win + Arrow keys.
    • Virtual Desktops/Spaces: Organize tasks using Task View (Windows) or Mission Control (macOS).
    • Ergonomics: Keep monitor tops at eye level. Use monitor arms if needed.
    • Cable Management: Use ties or sleeves.
    • Color Calibration: Use tools for color accuracy.
    • Personalize Backgrounds: Set individual or panoramic wallpapers.

    Troubleshooting Common Issues

    • No Signal: Check cables, input settings, drivers, and try rebooting.
    • Wrong Display Settings: Adjust resolution, scaling, and refresh rate.
    • Cursor Navigation Issues: Rearrange monitor layout in settings.
    • Apps Opening on Wrong Screen: Drag and close on the desired screen.
    • Performance Lag: Close background apps or update drivers.

    Conclusion

    Embracing a dual-monitor extended display setup is a simple yet powerful upgrade. It offers enhanced productivity, better organization, and a more comfortable workspace. Follow this guide to set up your monitors correctly and enjoy the full benefits of an expanded digital environment.

  • How to Recover Accidentally Deleted Files on Windows

    How to Recover Accidentally Deleted Files on Windows

    It happens to the best of us: in a moment of haste, you click “Delete,” and suddenly, that crucial document, cherished photo, or important project file vanishes. The panic sets in. Can you get it back? The good news is, in many cases, yes! Accidentally deleted files on Windows are often recoverable, but your chances improve significantly the sooner you act.

    Understanding how file deletion works in Windows is key to successful recovery. When you “delete” a file, especially from your local drive and not bypassing the Recycle Bin, the file isn’t immediately erased from your hard drive or Solid State Drive (SSD). Instead, Windows simply marks the space occupied by that file as “available” for new data. The file’s data remains until new information overwrites it. This concept is crucial in the field of data recovery, which has evolved significantly since the early days of computing when accidental deletion often meant permanent loss. Modern operating systems and recovery tools leverage this underlying mechanism to retrieve seemingly lost data.

    This guide will walk you through a series of methods to help you recover accidentally deleted files on your Windows computer, ranging from simple built-in solutions to more advanced techniques involving specialized software.

    Understanding File Deletion Types in Windows

    Before diving into recovery, it’s important to differentiate how files are deleted:

    • Soft Delete (To Recycle Bin): When you select a file and press Delete or right-click and choose “Delete,” the file is moved to the Recycle Bin. This is the easiest type of deletion to recover from.
      • Recycle Bin: A special folder in Windows that temporarily stores files and folders that have been deleted by the user, allowing for easy restoration.
    • Hard Delete (Bypassing Recycle Bin): This happens when you:
      • Press Shift + Delete.
      • Delete files from a USB drive, network drive, or external hard drive (these usually bypass the Recycle Bin).
      • Empty the Recycle Bin.
      • Delete files from the Command Prompt. In these cases, the file is immediately marked as free space, making recovery slightly more challenging but often still possible.

    Methods to Recover Accidentally Deleted Files

    Let’s explore the step-by-step methods to get your files back.

    Method 1: Check the Recycle Bin (The First and Easiest Step)

    This is always your first stop for any accidentally deleted file on your primary drive.

    • Step 1: Open the Recycle Bin.
      • Locate the Recycle Bin icon on your desktop and double-click it.
      • If you can’t find it, search for “Recycle Bin” in the Windows search bar.
    • Step 2: Locate Your File(s).
      • Browse through the list of deleted files. You can sort by “Date Deleted,” “Original Location,” or “Name” to help find your file.
      • Use the search bar in the Recycle Bin window if you know the file name or type.
    • Step 3: Restore the File(s).
      • Once you find the file(s) you want to recover, select them.
      • Right-click on the selected file(s) and choose “Restore.”
      • Alternatively, click the “Restore the selected items” button in the ribbon menu at the top.
    • Step 4: Verify Restoration.
      • The file(s) will be restored to their original location before deletion. Navigate to that folder to confirm.

    Method 2: Use File History (If Enabled)

    File History is a built-in Windows backup feature that automatically saves copies of files in your Libraries, Desktop, Favorites, and Contacts folders. It requires an external drive to be set up. If you’ve enabled it, this is a powerful recovery tool.

    File History: A backup and recovery feature in Windows that regularly saves copies of your files, allowing you to restore previous versions of files or entire folders.

    • Step 1: Open File History.
      • Open Settings (Windows Key + I).
      • Go to System > Storage.
      • Scroll down and click on “Advanced storage settings,” then “Backup options.”
      • Under “Looking for an older backup?”, click “Go to Backup and Restore (Windows 7)” if you’re using an older backup.
      • Or, directly search for “Restore your files with File History” in the Windows search bar and open it.
    • Step 2: Browse for Your File.
      • In the File History window, navigate to the folder where your file was originally located.
      • Use the left and right arrows at the bottom to browse through different versions of your folders and files, based on the dates backups were taken.
    • Step 3: Restore the File.
      • Once you find the desired version of your file or folder, select it.
      • Click the green circular arrow button at the bottom to restore it to its original location.
      • If the original location is unavailable or you want to restore it elsewhere, right-click the green arrow and choose “Restore to…”

    I’ve personally found File History to be a lifesaver for documents I’ve accidentally overwritten or deleted from common folders. It’s truly a “set it and forget it” feature for basic file protection.

    Method 3: Recover Previous Versions of Files or Folders

    This feature, related to System Restore Points and File History, allows you to revert a file or folder to a previous state. It works even if File History isn’t explicitly set up, provided System Protection is enabled for the drive.

    Previous Versions: A feature in Windows that allows users to restore files and folders to an earlier state, based on restore points or File History backups.

    • Step 1: Navigate to the Parent Folder.
      • Open File Explorer and go to the folder where the deleted file was originally located. If you deleted the folder itself, go to its parent folder.
    • Step 2: Access “Restore previous versions.”
      • Right-click on the folder.
      • Select “Properties” from the context menu.
      • Go to the “Previous Versions” tab.
    • Step 3: Select and Restore.
      • You’ll see a list of available previous versions of that folder, each with a date and time.
      • Select the version that you know contained the deleted file (choose a date before the deletion occurred).
      • You have three options:
        • Open: To view the contents and copy the desired file manually.
        • Copy: To copy the folder (and its contents) to a new location.
        • Restore: To replace the current version of the folder with the selected previous version (use with caution as this will overwrite current files in that folder).
      • It’s generally safer to Open the previous version and copy only the specific file(s) you need to a different location.

    Method 4: Use Windows File Recovery (Microsoft’s Free Tool)

    For files that have bypassed the Recycle Bin or were deleted long ago, Windows File Recovery is a free command-line utility from Microsoft. It’s powerful but requires comfort with the Command Prompt.

    Windows File Recovery: A command-line utility developed by Microsoft for recovering lost files from local storage devices.

    • Step 1: Download Windows File Recovery.
      • Go to the Microsoft Store and search for “Windows File Recovery.”
      • Click “Get” or “Install” to download and install it.
    • Step 2: Open Command Prompt as Administrator.
      • Search for “cmd” in the Windows search bar.
      • Right-click on “Command Prompt” and select “Run as administrator.”
    • Step 3: Understand the Syntax.
      • The basic syntax for the winfr command is:winfr source-drive: destination-drive: /mode [/switches]
        • source-drive: The drive where the file was deleted (e.g., C:).
        • destination-drive: The drive where you want to save the recovered files (MUST be different from the source drive, e.g., D: or a USB drive).
        • /mode: The recovery mode (Default, Segment, Signature).
        • /switches: Specific filters like /n for file path/name, /ext for extension, etc.
      • Recovery Modes:
        • Default Mode: Good for recently deleted files on NTFS drives.
        • Segment Mode: For NTFS drives, recovers files using file record segments.
        • Signature Mode: Recovers files across different file systems (NTFS, FAT, exFAT) by searching for specific file types (signatures like .JPG, .PDF, .ZIP). Useful if default/segment fail.
    • Step 4: Run the Recovery Command.
      • Example (Default Mode): Recover a deleted PNG file from C: to D: drive:winfr C: D: /n \Users\<YourUsername>\Pictures\DeletedImage.png
      • Example (Signature Mode): Recover all JPG files from C: to D: drive:winfr C: D: /x /y:JPEG (where /x enables signature mode, /y: specifies file types)
      • Important: Consult Microsoft’s official documentation or type winfr /? in Command Prompt for a full list of modes and switches.
    • Step 5: Access Recovered Files.
      • After the command completes, a folder named “Recovery_

    This tool is a bit more technical, but it’s powerful because it bypasses the GUI and works directly with the drive’s data. I’ve seen it succeed where other methods failed, especially for hard-deleted items.

    Method 5: Use Third-Party Data Recovery Software

    When built-in tools fail, specialized third-party data recovery software can often retrieve files that are no longer easily accessible. These tools use advanced algorithms to scan the drive’s raw data for deleted file signatures.

    • Key Principle: Stop using the drive immediately! Any new data written to the drive (even just Browse the internet) can overwrite the space where your deleted file resides, making it unrecoverable.
    • Step 1: Choose Reputable Software.
      • Popular and well-regarded options include:
        • Recuva: A free and easy-to-use option for basic recovery.
        • EaseUS Data Recovery Wizard: Offers a free trial with a limited recovery amount, then requires purchase.
        • Disk Drill: Similar to EaseUS, with a free trial.
        • TestDisk & PhotoRec: Free, open-source, and highly powerful (command-line based), but steeper learning curve.
    • Step 2: Download and Install (on a different drive if possible).
      • Download the software to a different drive than the one you’re trying to recover from to prevent overwriting the deleted file. If you only have one drive, download it quickly and limit other activity.
    • Step 3: Scan the Drive.
      • Launch the software and select the drive where your files were deleted.
      • Choose the type of scan (quick scan first, then deep scan if needed).
      • Start the scan. This can take anywhere from minutes to several hours depending on the drive size and scan depth.
    • Step 4: Preview and Recover.
      • The software will display a list of recoverable files, often with an indication of their condition (e.g., “Excellent,” “Poor”).
      • Preview files if possible to ensure they are the correct ones and not corrupted.
      • Select the files you want to recover and choose a destination drive that is different from the source drive to save them.

    Important Considerations for File Recovery

    • Act Immediately: The moment you realize you’ve deleted a file, stop using the drive where it was located. Every minute of continued use increases the risk of the data being overwritten.
    • Do Not Save New Files: Avoid saving any new files or installing new software on the affected drive until recovery is complete.
    • Use a Different Drive for Recovery: Always recover files to a different drive (e.g., a USB stick, an external hard drive, or another internal partition) than the one they were deleted from.
    • Understand Different Drive Types:
      • HDDs (Hard Disk Drives): Recovery is generally more successful on HDDs because data isn’t truly erased until overwritten.
      • SSDs (Solid State Drives): Recovery from SSDs can be more challenging due to TRIM technology. TRIM actively wipes data blocks when files are deleted to maintain performance. If TRIM has run, data recovery might be impossible. However, for very recent deletions, recovery might still be feasible.
        • TRIM: A command that allows an operating system to tell a solid-state drive (SSD) which data blocks are no longer considered in use and can be wiped internally.
    • Regular Backups are Key: The best “recovery plan” is a good backup strategy. Implement a regular backup routine for your critical files using File History, cloud services (OneDrive, Google Drive), or external drives.

    By following these methods and precautions, you significantly increase your chances of successfully recovering your accidentally deleted files on Windows. Don’t give up hope too quickly!

    Frequently Asked Questions (FAQ)

    Q1: Can I recover files deleted permanently (bypassing the Recycle Bin)?

    Yes, in many cases, you can recover files deleted permanently (e.g., using Shift+Delete, or emptying the Recycle Bin). These files are not immediately erased but are marked as free space. Tools like Windows File Recovery or third-party data recovery software can often scan for and retrieve them, provided the data hasn’t been overwritten by new information.

    Q2: How long do deleted files stay on my hard drive?

    Deleted files remain on your hard drive (or SSD) until their space is overwritten by new data. There’s no fixed time limit; it depends entirely on how much new data is written to the drive after the deletion. The less you use the drive, the longer the data might remain recoverable.

    Q3: What is “data overwriting” and why is it bad for file recovery?

    Data overwriting occurs when new data is written to the same physical location on your storage device where a previously deleted file’s data resided. Once overwritten, the original data is destroyed and becomes unrecoverable by conventional means. This is why it’s crucial to stop using the affected drive immediately after accidental deletion.

    Q4: Does the Recycle Bin have a size limit?

    Yes, the Recycle Bin does have a configurable size limit. Once this limit is reached, Windows will automatically delete the oldest files in the Recycle Bin to make space for newly deleted ones. You can adjust this limit by right-clicking the Recycle Bin, selecting “Properties,” and configuring the “Custom size” for each drive.

    Q5: Can I recover files from a formatted hard drive?

    A5: Recovering files from a formatted hard drive is more challenging than recovering simply deleted files, but it’s often still possible, especially with a quick format. Third-party data recovery software is typically required for this. A full format, however, might make recovery much more difficult or impossible as it can overwrite more data.

    Q6: Why do I need to save recovered files to a different drive?

    You must save recovered files to a different drive than the one you are recovering from. If you save them back to the source drive, you risk writing new data onto the very space where the deleted files are still residing, potentially overwriting and permanently destroying the data you are trying to recover.

    Q7: What is TRIM and how does it affect SSD data recovery?

    TRIM is a command used by Solid State Drives (SSDs). When you delete a file from an SSD, the operating system sends a TRIM command to the SSD controller, telling it that those data blocks are no longer in use. The SSD then internally wipes those blocks to maintain performance. This means that data deleted from an SSD with TRIM enabled is often permanently erased very quickly, making recovery significantly harder or impossible compared to Hard Disk Drives (HDDs).

  • How to Stop Laptop from Overheating While Gaming

    How to Stop Laptop from Overheating While Gaming

    Gaming on a laptop can push its hardware to the limits, often leading to overheating. This not only affects performance but can also shorten your device’s lifespan. Here’s a comprehensive guide to help you manage and prevent overheating issues.

    Step 1: Ensure Proper Ventilation

    Place your laptop on a hard, flat surface. Soft surfaces like beds or couches can block air vents, restricting airflow and causing heat buildup. Using a laptop cooling pad can further enhance airflow and reduce temperatures.

    Step 2: Clean the Internal Components

    Dust accumulation inside your laptop can clog fans and vents.

    • Power off and unplug your laptop.
    • Use compressed air to blow out dust from vents and fans.
    • Avoid using a vacuum, as it can generate static electricity.

    Regular cleaning can significantly improve cooling efficiency.

    Step 3: Monitor and Control Fan Speeds

    Install software like SpeedFan or HWMonitor to:

    • Monitor internal temperatures.
    • Adjust fan speeds to increase cooling when necessary.

    Some laptops also offer built-in utilities to control fan behavior.

    Step 4: Update Drivers and BIOS

    Outdated drivers can lead to inefficient hardware performance.

    • Update your graphics drivers from the manufacturer’s website.
    • Check for BIOS updates on your laptop manufacturer’s support page.

    Keeping software up-to-date ensures optimal hardware communication and performance.

    Step 5: Optimize Game Settings

    High graphics settings demand more from your hardware.

    • Lower in-game settings like resolution, texture quality, and shadows.
    • Enable V-Sync to cap frame rates, reducing GPU load.

    Balancing performance and visual quality can reduce heat generation.

    Step 6: Close Unnecessary Background Applications

    Running multiple applications simultaneously increases CPU and RAM usage.

    • Use Task Manager to identify and close non-essential programs.
    • Disable startup programs that aren’t needed during gaming sessions.

    This frees up resources and reduces overall system strain.

    Step 7: Adjust Power Settings

    Windows power plans can influence performance and heat output.

    • Select the ‘Balanced’ or ‘Power Saver’ plan instead of ‘High Performance’.
    • Customize advanced settings to limit maximum processor state.

    This approach reduces power consumption and heat generation.

    Step 8: Reapply Thermal Paste (Advanced)

    Thermal paste facilitates heat transfer between the CPU/GPU and heatsinks.

    • Over time, thermal paste can degrade, reducing its effectiveness.
    • Reapplying thermal paste can improve heat dissipation.

    Note: This step involves disassembling your laptop and should only be done if you’re confident in your technical skills or by a professional.

    Step 9: Use External Cooling Solutions

    External fans or cooling stands can aid in temperature management.

    • USB-powered fans can direct additional airflow to hotspots.
    • Elevated stands promote better air circulation underneath the laptop.

    These tools provide supplementary cooling support during intensive gaming sessions.

    Step 10: Monitor Ambient Room Temperature

    High room temperatures can exacerbate laptop overheating.

    • Use air conditioning or fans to maintain a cooler environment.
    • Avoid gaming in direct sunlight or near heat sources.

    A cooler ambient temperature helps your laptop dissipate heat more effectively.