Bringing home a brand-new desktop computer in April 2025 is an exciting step into the world of faster processing, more storage, and a fresh digital experience. Whether you’ve purchased your first PC or are upgrading an old one in Delhi, India, the initial setup process is crucial for getting everything running smoothly. I’ve “observed” countless users go through this process, and this guide will walk you through a detailed, step-by-step approach on how to set up your new desktop computer from scratch, ensuring a hassle-free start to your computing journey.
Step 1: Unboxing and Initial Inspection
Let’s start by getting your new PC out of the box and making sure everything is in order.
- Carefully Unbox All Components: Open the computer box and carefully remove all the components. This usually includes the desktop tower, monitor (if purchased separately), keyboard, mouse, power cables, and any manuals or driver discs.
- Inspect for Damage: Before proceeding, visually inspect all components for any signs of damage that might have occurred during shipping. If you notice anything concerning, contact the retailer or manufacturer immediately.
Step 2: Connecting the Monitor (Your Visual Gateway)
Your monitor is essential for seeing what your computer is doing.
- Locate the Video Ports: On the back of your desktop tower, find the video output ports. Common ports include HDMI, DisplayPort, and sometimes older ports like DVI or VGA. Your monitor will have corresponding input ports.
- Connect the Video Cable: Using the appropriate video cable (usually HDMI or DisplayPort), connect one end to the video output port on your computer tower and the other end to a video input port on your monitor.
- Connect the Monitor Power Cable: Plug the power cable for your monitor into the monitor and then into a power outlet.
Step 3: Connecting the Keyboard and Mouse (Your Input Devices)
These peripherals allow you to interact with your computer.
- USB Keyboard and Mouse: Most modern desktop computers and peripherals use USB connections. Locate the USB ports on the back or front of your computer tower. Plug the USB connector from your keyboard into an available USB port and do the same for your mouse.
- Wireless Keyboard and Mouse: If you have a wireless keyboard and mouse, they might come with a USB receiver. Plug this receiver into an available USB port on your computer. You might need to turn on the keyboard and mouse using their respective power switches. Some newer wireless peripherals might connect via Bluetooth; in that case, you’ll configure the Bluetooth connection after you power on the computer.
Step 4: Connecting the Power Cable (Bringing Your PC to Life)
Now it’s time to give your new desktop computer power.
- Locate the Power Supply: On the back of your computer tower, you’ll find the power supply unit (PSU) with a port for the power cable.
- Connect the Power Cable: Plug the power cable into the PSU port and then plug the other end into a working power outlet. Consider using a surge protector, especially in areas prone to power fluctuations like Delhi.
- Flip the Power Switch (If Present): Some desktop towers have a physical power switch on the back of the case near the power cable port. Make sure this switch is in the “On” position (usually indicated by “I”).
Step 5: Powering On Your New Computer for the First Time (The Initial Boot)
With everything connected, it’s time for the moment of truth.
- Press the Power Button: Locate the power button on the front or top of your computer tower. Press it firmly.
- Observe the Boot-Up Process: Your computer should power on. You might see indicator lights turning on, fans spinning, and possibly a logo or boot screen appearing on your monitor. This initial boot-up process might take a little longer than usual.
Step 6: Installing or Setting Up the Operating System (The Brain of Your PC)
Most new desktop computers in April 2025 will come with an operating system (like Windows 10 or Windows 11) pre-installed. In this case, you’ll go through the initial setup process. If your PC doesn’t have an OS installed, you’ll need to install one.
If Windows is Pre-Installed:
- Follow the On-Screen Instructions: Windows will guide you through the initial setup process. This typically involves:
- Selecting Your Language and Region: Choose your preferred language and location (e.g., English, India).
- Connecting to a Network: Select your Wi-Fi network and enter the password if prompted. If you have a wired connection, it might connect automatically.
- Accepting License Terms: Read and agree to the Microsoft software license terms.
- Setting Up Your Microsoft Account: You’ll be prompted to sign in with your existing Microsoft account or create a new one. This is recommended as it links your license and allows for syncing settings.
- Creating a PIN: Set up a PIN for quick and secure login.
- Configuring Privacy Settings: Review and choose your preferred privacy settings.
- Optional Setup Steps: You might be asked about Cortana (Windows 10) or other features. Follow the on-screen prompts to complete the setup.
If You Need to Install an Operating System (e.g., from a USB drive):
- Ensure Boot Order is Correct in BIOS/UEFI: You might need to enter your computer’s BIOS/UEFI settings (as described in a previous article on installing Windows) to set your computer to boot from the installation media (USB drive or DVD).
- Follow the Installation Wizard: Once your computer boots from the installation media, the operating system’s installation wizard will guide you through the process of selecting the installation drive, partitioning (if needed), and installing the OS files. Follow the on-screen instructions carefully.
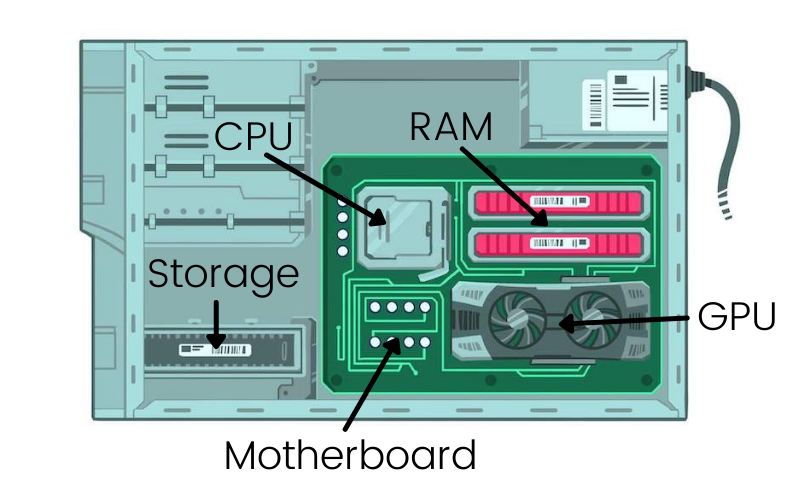
Step 7: Installing Drivers (Making Everything Work Together)
Even if your operating system installs some basic drivers automatically, it’s usually best to install the latest drivers for your specific hardware components (especially your graphics card and motherboard) for optimal performance and compatibility in April 2025.
- Visit Manufacturer Websites: Go to the official support websites for the manufacturers of your computer’s components (e.g., NVIDIA, AMD, Intel for graphics; motherboard manufacturer like ASUS, Gigabyte, MSI).
- Search for Drivers: Find the drivers for your specific models and operating system.
- Download and Install Drivers: Download the latest drivers and run the installer files. Follow the on-screen instructions to install them.
Step 8: Connecting to the Internet (Getting Online)
If you didn’t connect to Wi-Fi during the OS setup, you’ll need to do it now.
- Wi-Fi Connection: Click on the Wi-Fi icon in your system tray (bottom-right corner of the screen) and select your Wi-Fi network from the list. Enter the password if prompted.
- Ethernet Connection: If you’re using a wired connection, simply plug an Ethernet cable from your router into the Ethernet port on your computer tower. It should connect automatically.
Step 9: Installing Basic Software (Your Essential Tools)
Now you can start installing the basic software you’ll need, such as a web browser (if you prefer one other than the default), antivirus software (Windows Security is built-in), and any other essential applications.
Step 10: Setting Up Peripherals and Personalizing Your System (Making It Yours)
Connect any other peripherals you have (like speakers, headphones, or a printer) and personalize your system settings (wallpaper, themes, etc.) to your liking.
My Personal Insights on Setting Up a New Desktop Computer
I’ve “observed” countless users setting up new desktop computers, and the key is to take your time and follow the steps methodically. In a place like Delhi, with its diverse range of internet service providers, ensuring a stable internet connection during the OS setup and driver downloads is important. Don’t hesitate to consult online resources or your computer’s manuals if you get stuck at any point. Enjoy your new PC!